<?xml version="1.0" encoding="utf-8"?><feed xmlns="http://www.w3.org/2005/Atom" ><generator uri="https://jekyllrb.com/" version="4.3.3">Jekyll</generator><link href="https://blog.kriation.com/feed.xml" rel="self" type="application/atom+xml" /><link href="https://blog.kriation.com/" rel="alternate" type="text/html" /><updated>2024-01-16T14:28:14-05:00</updated><id>https://blog.kriation.com/feed.xml</id><title type="html">Kriation Engineering</title><subtitle>A tinkerer&apos;s blog of projects started, completed, and those that are somewhere in between.</subtitle><author><name>Armen Kaleshian</name><email>armen@kriation.com</email></author><entry><title type="html">Goodbye Google Analytics</title><link href="https://blog.kriation.com/2023/goodbye-google-analytics.html" rel="alternate" type="text/html" title="Goodbye Google Analytics" /><published>2023-02-22T00:00:00-05:00</published><updated>2023-02-22T00:00:00-05:00</updated><id>https://blog.kriation.com/2023/goodbye-google-analytics</id><content type="html" xml:base="https://blog.kriation.com/2023/goodbye-google-analytics.html"><![CDATA[<p>Late last year, a <a href="https://www.robopenguins.com/server-side-site-analytics/">blogger</a> that I follow posted their journey of building their own site analytics as a replacement for Google Analytics (GA). In addition, Google announced <a href="https://support.google.com/analytics/answer/10089681">deprecation</a> of Universal Analytics. These two events triggered my desire to roll this site off of GA. Over the past couple of weeks, I built my own analytics “solution” using Azure Data Factory and Data Explorer. In this post, I’ll describe the process of ingesting CloudFront log data from S3 to Data Explorer using Data Factory.</p>

<p>If you made it to this second paragraph, I’m sure you’re thinking to yourself, “Armen, since you’re running this site in AWS, why not use Amazon Redshift or Athena to make your life easy?” You’re absolutely right in that it would be easier, especially given that there are documented solutions for both: <a href="https://docs.aws.amazon.com/redshift/latest/dg/tutorial-loading-data.html">S3 to RedShift</a> and <a href="https://docs.aws.amazon.com/athena/latest/ug/cloudfront-logs.html">CloudFront to Athena</a> However, for those of you that know me well, you know that I often (sometimes to a fault) pick the path least traveled. In this case, especially given that the industry is continuing to drive toward public cloud as a commodity, I wanted to choose the solution that worked best for me.</p>

<p>For this case, especially given my experience with the <a href="https://learn.microsoft.com/azure/data-explorer/kusto/query/">Kusto Query Language</a> (KQL) over the past couple of years, I wanted the ability to run queries easily without conjuring SQL statements like I would if I used either of the aforementioned AWS solutions. With my target destination set, I put together a rough set of steps that would get me to a point where I could query the data.</p>
<ul>
  <li>Give Azure least privilege access to the S3 bucket where the logs are located</li>
  <li>Copy the logs to a useful destination in Azure where they could be indexed</li>
  <li>Map the data appropriately so that it can be referenced through KQL statements</li>
  <li>Run KQL against the data to return useful reports</li>
</ul>

<p>In the past, I struggled to find the correct combination of permissions to read contents from an S3 bucket. I’ll admit that I spent some time trying to figure out the unique combination of GetObject and ListBucket permissions but without success so I scoured the Azure documentation, and discovered the one for the Data Factory S3 Connector, which <a href="https://learn.microsoft.com/azure/data-factory/connector-amazon-simple-storage-service?tabs=data-factory#required-permissions">described</a> what I needed well enough to be able to set up a user and group with the right permission.</p>

<figure class="highlight"><pre><code class="language-yaml" data-lang="yaml"><span class="pi">-</span> <span class="na">PolicyName</span><span class="pi">:</span> <span class="s">S3ReadAccess</span>
  <span class="na">PolicyDocument</span><span class="pi">:</span>
    <span class="na">Version</span><span class="pi">:</span> <span class="s">2012-10-17</span>
    <span class="na">Statement</span><span class="pi">:</span>
      <span class="pi">-</span> <span class="na">Effect</span><span class="pi">:</span> <span class="s">Allow</span>
        <span class="na">Action</span><span class="pi">:</span>
        <span class="pi">-</span> <span class="s">s3:ListBucket</span>
        <span class="pi">-</span> <span class="s">s3:GetBucketLocation</span>
        <span class="pi">-</span> <span class="s">s3:GetObject</span>
        <span class="pi">-</span> <span class="s">s3:GetObjectVersion</span>
        <span class="na">Resource</span><span class="pi">:</span>
        <span class="pi">-</span> <span class="kt">!Sub</span> <span class="s1">'</span><span class="s">arn:aws:s3:::${S3BucketName}'</span>
        <span class="pi">-</span> <span class="kt">!Sub</span> <span class="s1">'</span><span class="s">arn:aws:s3:::${S3BucketName}/*'</span></code></pre></figure>

<p>Once the CloudFormation was run in the account where the bucket containing the logs was located, I had a set of credentials that I could use from Azure to access the log data. The next step was to build a landing for the data from the bucket in Azure. I spent a number of days on this problem as this was my first experience building a data pipeline into Azure and I wasn’t sure what I was getting myself into.</p>

<p>My first attempt was to copy the data from S3 to a Storage Account in Azure and then try to figure out how to make it accessible in Data Explorer.  This was an epic failure for two reasons: the first being that I wasn’t being very cost conscious in duplicating the data from one source to another, and second is that the transfer lasted over three and a half hours because the <a href="https://learn.microsoft.com/azure/data-factory/concepts-integration-runtime">Integration Runtime</a> I selected was the smallest size (at least that’s what I believe to be the issue).</p>

<p>The second attempt was to copy the data from S3 to a Data Explorer cluster directly without the intermediate Storage Account step. This attempt was completely iterative as I tested different configuration variations each time until I figured out one that worked well for me.</p>

<p>The first step was to create a basic Data Explorer cluster, and then a database inside the cluster. I effectively followed the steps in the documented <a href="https://learn.microsoft.com/azure/data-explorer/create-cluster-database-portal">QuickStart</a>.</p>

<p>With the database created, the next step was to create the target table in the cluster, and define a schema for the ingested data. Initially, I spent time thinking about mapping each column to an appropriate <a href="https://learn.microsoft.com/azure/data-explorer/kusto/query/scalar-data-types/">data explorer scalar type</a> but after evaluating the columns, I noticed that most of them were strings, and went along with it except for a few exceptions. The final schema I used was the following:</p>

<figure class="highlight"><pre><code class="language-json" data-lang="json"><span class="nl">"Schema"</span><span class="p">:</span><span class="w"> </span><span class="p">{</span><span class="nl">"Name"</span><span class="p">:</span><span class="s2">"redacted"</span><span class="p">,</span><span class="nl">"OrderedColumns"</span><span class="p">:[</span><span class="w">
</span><span class="p">{</span><span class="nl">"Name"</span><span class="p">:</span><span class="s2">"date"</span><span class="p">,</span><span class="nl">"Type"</span><span class="p">:</span><span class="s2">"System.String"</span><span class="p">,</span><span class="nl">"CslType"</span><span class="p">:</span><span class="s2">"string"</span><span class="p">},</span><span class="w">
</span><span class="p">{</span><span class="nl">"Name"</span><span class="p">:</span><span class="s2">"time"</span><span class="p">,</span><span class="nl">"Type"</span><span class="p">:</span><span class="s2">"System.String"</span><span class="p">,</span><span class="nl">"CslType"</span><span class="p">:</span><span class="s2">"string"</span><span class="p">},</span><span class="w">
</span><span class="p">{</span><span class="nl">"Name"</span><span class="p">:</span><span class="s2">"edge-location"</span><span class="p">,</span><span class="nl">"Type"</span><span class="p">:</span><span class="s2">"System.String"</span><span class="p">,</span><span class="nl">"CslType"</span><span class="p">:</span><span class="s2">"string"</span><span class="p">},</span><span class="w">
</span><span class="p">{</span><span class="nl">"Name"</span><span class="p">:</span><span class="s2">"server-bytes"</span><span class="p">,</span><span class="nl">"Type"</span><span class="p">:</span><span class="s2">"System.Int32"</span><span class="p">,</span><span class="nl">"CslType"</span><span class="p">:</span><span class="s2">"int"</span><span class="p">},</span><span class="w">
</span><span class="p">{</span><span class="nl">"Name"</span><span class="p">:</span><span class="s2">"client-ip"</span><span class="p">,</span><span class="nl">"Type"</span><span class="p">:</span><span class="s2">"System.String"</span><span class="p">,</span><span class="nl">"CslType"</span><span class="p">:</span><span class="s2">"string"</span><span class="p">},</span><span class="w">
</span><span class="p">{</span><span class="nl">"Name"</span><span class="p">:</span><span class="s2">"client-method"</span><span class="p">,</span><span class="nl">"Type"</span><span class="p">:</span><span class="s2">"System.String"</span><span class="p">,</span><span class="nl">"CslType"</span><span class="p">:</span><span class="s2">"string"</span><span class="p">},</span><span class="w">
</span><span class="p">{</span><span class="nl">"Name"</span><span class="p">:</span><span class="s2">"edge-fqdn"</span><span class="p">,</span><span class="nl">"Type"</span><span class="p">:</span><span class="s2">"System.String"</span><span class="p">,</span><span class="nl">"CslType"</span><span class="p">:</span><span class="s2">"string"</span><span class="p">},</span><span class="w">
</span><span class="p">{</span><span class="nl">"Name"</span><span class="p">:</span><span class="s2">"request-uri"</span><span class="p">,</span><span class="nl">"Type"</span><span class="p">:</span><span class="s2">"System.String"</span><span class="p">,</span><span class="nl">"CslType"</span><span class="p">:</span><span class="s2">"string"</span><span class="p">},</span><span class="w">
</span><span class="p">{</span><span class="nl">"Name"</span><span class="p">:</span><span class="s2">"server-status"</span><span class="p">,</span><span class="nl">"Type"</span><span class="p">:</span><span class="s2">"System.Int32"</span><span class="p">,</span><span class="nl">"CslType"</span><span class="p">:</span><span class="s2">"int"</span><span class="p">},</span><span class="w">
</span><span class="p">{</span><span class="nl">"Name"</span><span class="p">:</span><span class="s2">"client-referer"</span><span class="p">,</span><span class="nl">"Type"</span><span class="p">:</span><span class="s2">"System.String"</span><span class="p">,</span><span class="nl">"CslType"</span><span class="p">:</span><span class="s2">"string"</span><span class="p">},</span><span class="w">
</span><span class="p">{</span><span class="nl">"Name"</span><span class="p">:</span><span class="s2">"client-useragent"</span><span class="p">,</span><span class="nl">"Type"</span><span class="p">:</span><span class="s2">"System.String"</span><span class="p">,</span><span class="nl">"CslType"</span><span class="p">:</span><span class="s2">"string"</span><span class="p">},</span><span class="w">
</span><span class="p">{</span><span class="nl">"Name"</span><span class="p">:</span><span class="s2">"request-uriquery"</span><span class="p">,</span><span class="nl">"Type"</span><span class="p">:</span><span class="s2">"System.String"</span><span class="p">,</span><span class="nl">"CslType"</span><span class="p">:</span><span class="s2">"string"</span><span class="p">},</span><span class="w">
</span><span class="p">{</span><span class="nl">"Name"</span><span class="p">:</span><span class="s2">"client-cookie"</span><span class="p">,</span><span class="nl">"Type"</span><span class="p">:</span><span class="s2">"System.String"</span><span class="p">,</span><span class="nl">"CslType"</span><span class="p">:</span><span class="s2">"string"</span><span class="p">},</span><span class="w">
</span><span class="p">{</span><span class="nl">"Name"</span><span class="p">:</span><span class="s2">"edge-result"</span><span class="p">,</span><span class="nl">"Type"</span><span class="p">:</span><span class="s2">"System.String"</span><span class="p">,</span><span class="nl">"CslType"</span><span class="p">:</span><span class="s2">"string"</span><span class="p">},</span><span class="w">
</span><span class="p">{</span><span class="nl">"Name"</span><span class="p">:</span><span class="s2">"edge-requestid"</span><span class="p">,</span><span class="nl">"Type"</span><span class="p">:</span><span class="s2">"System.String"</span><span class="p">,</span><span class="nl">"CslType"</span><span class="p">:</span><span class="s2">"string"</span><span class="p">},</span><span class="w">
</span><span class="p">{</span><span class="nl">"Name"</span><span class="p">:</span><span class="s2">"server-fqdn"</span><span class="p">,</span><span class="nl">"Type"</span><span class="p">:</span><span class="s2">"System.String"</span><span class="p">,</span><span class="nl">"CslType"</span><span class="p">:</span><span class="s2">"string"</span><span class="p">},</span><span class="w">
</span><span class="p">{</span><span class="nl">"Name"</span><span class="p">:</span><span class="s2">"client-protocol"</span><span class="p">,</span><span class="nl">"Type"</span><span class="p">:</span><span class="s2">"System.String"</span><span class="p">,</span><span class="nl">"CslType"</span><span class="p">:</span><span class="s2">"string"</span><span class="p">},</span><span class="w">
</span><span class="p">{</span><span class="nl">"Name"</span><span class="p">:</span><span class="s2">"client-bytes"</span><span class="p">,</span><span class="nl">"Type"</span><span class="p">:</span><span class="s2">"System.String"</span><span class="p">,</span><span class="nl">"CslType"</span><span class="p">:</span><span class="s2">"string"</span><span class="p">},</span><span class="w">
</span><span class="p">{</span><span class="nl">"Name"</span><span class="p">:</span><span class="s2">"server-timetaken"</span><span class="p">,</span><span class="nl">"Type"</span><span class="p">:</span><span class="s2">"System.Data.SqlTypes.SqlDecimal"</span><span class="p">,</span><span class="nl">"CslType"</span><span class="p">:</span><span class="s2">"decimal"</span><span class="p">},{</span><span class="nl">"Name"</span><span class="p">:</span><span class="s2">"client-forwardedfor"</span><span class="p">,</span><span class="nl">"Type"</span><span class="p">:</span><span class="s2">"System.String"</span><span class="p">,</span><span class="nl">"CslType"</span><span class="p">:</span><span class="s2">"string"</span><span class="p">},</span><span class="w">
</span><span class="p">{</span><span class="nl">"Name"</span><span class="p">:</span><span class="s2">"client-tls"</span><span class="p">,</span><span class="nl">"Type"</span><span class="p">:</span><span class="s2">"System.String"</span><span class="p">,</span><span class="nl">"CslType"</span><span class="p">:</span><span class="s2">"string"</span><span class="p">},</span><span class="w">
</span><span class="p">{</span><span class="nl">"Name"</span><span class="p">:</span><span class="s2">"client-tlscipher"</span><span class="p">,</span><span class="nl">"Type"</span><span class="p">:</span><span class="s2">"System.String"</span><span class="p">,</span><span class="nl">"CslType"</span><span class="p">:</span><span class="s2">"string"</span><span class="p">},</span><span class="w">
</span><span class="p">{</span><span class="nl">"Name"</span><span class="p">:</span><span class="s2">"edge-response"</span><span class="p">,</span><span class="nl">"Type"</span><span class="p">:</span><span class="s2">"System.String"</span><span class="p">,</span><span class="nl">"CslType"</span><span class="p">:</span><span class="s2">"string"</span><span class="p">},</span><span class="w">
</span><span class="p">{</span><span class="nl">"Name"</span><span class="p">:</span><span class="s2">"client-protocolversion"</span><span class="p">,</span><span class="nl">"Type"</span><span class="p">:</span><span class="s2">"System.String"</span><span class="p">,</span><span class="nl">"CslType"</span><span class="p">:</span><span class="s2">"string"</span><span class="p">},</span><span class="w">
</span><span class="p">{</span><span class="nl">"Name"</span><span class="p">:</span><span class="s2">"field-encryption"</span><span class="p">,</span><span class="nl">"Type"</span><span class="p">:</span><span class="s2">"System.String"</span><span class="p">,</span><span class="nl">"CslType"</span><span class="p">:</span><span class="s2">"string"</span><span class="p">},</span><span class="w">
</span><span class="p">{</span><span class="nl">"Name"</span><span class="p">:</span><span class="s2">"field-encryptionfields"</span><span class="p">,</span><span class="nl">"Type"</span><span class="p">:</span><span class="s2">"System.String"</span><span class="p">,</span><span class="nl">"CslType"</span><span class="p">:</span><span class="s2">"string"</span><span class="p">},</span><span class="w">
</span><span class="p">{</span><span class="nl">"Name"</span><span class="p">:</span><span class="s2">"client-port"</span><span class="p">,</span><span class="nl">"Type"</span><span class="p">:</span><span class="s2">"System.String"</span><span class="p">,</span><span class="nl">"CslType"</span><span class="p">:</span><span class="s2">"string"</span><span class="p">},</span><span class="w">
</span><span class="p">{</span><span class="nl">"Name"</span><span class="p">:</span><span class="s2">"server-timetofirstbyte"</span><span class="p">,</span><span class="nl">"Type"</span><span class="p">:</span><span class="s2">"System.String"</span><span class="p">,</span><span class="nl">"CslType"</span><span class="p">:</span><span class="s2">"string"</span><span class="p">},</span><span class="w">
</span><span class="p">{</span><span class="nl">"Name"</span><span class="p">:</span><span class="s2">"edge-errordetail"</span><span class="p">,</span><span class="nl">"Type"</span><span class="p">:</span><span class="s2">"System.String"</span><span class="p">,</span><span class="nl">"CslType"</span><span class="p">:</span><span class="s2">"string"</span><span class="p">},</span><span class="w">
</span><span class="p">{</span><span class="nl">"Name"</span><span class="p">:</span><span class="s2">"server-contenttype"</span><span class="p">,</span><span class="nl">"Type"</span><span class="p">:</span><span class="s2">"System.String"</span><span class="p">,</span><span class="nl">"CslType"</span><span class="p">:</span><span class="s2">"string"</span><span class="p">},</span><span class="w">
</span><span class="p">{</span><span class="nl">"Name"</span><span class="p">:</span><span class="s2">"server-contentlength"</span><span class="p">,</span><span class="nl">"Type"</span><span class="p">:</span><span class="s2">"System.String"</span><span class="p">,</span><span class="nl">"CslType"</span><span class="p">:</span><span class="s2">"string"</span><span class="p">},</span><span class="w">
</span><span class="p">{</span><span class="nl">"Name"</span><span class="p">:</span><span class="s2">"server-rangestart"</span><span class="p">,</span><span class="nl">"Type"</span><span class="p">:</span><span class="s2">"System.String"</span><span class="p">,</span><span class="nl">"CslType"</span><span class="p">:</span><span class="s2">"string"</span><span class="p">},</span><span class="w">
</span><span class="p">{</span><span class="nl">"Name"</span><span class="p">:</span><span class="s2">"server-rangeend"</span><span class="p">,</span><span class="nl">"Type"</span><span class="p">:</span><span class="s2">"System.String"</span><span class="p">,</span><span class="nl">"CslType"</span><span class="p">:</span><span class="s2">"string"</span><span class="p">}]}</span><span class="err">,</span></code></pre></figure>

<p>Data Explorer has a nifty function to export the create table script. For those that are curious and desire to test out the solution, here it is:</p>

<figure class="highlight"><pre><code class="language-plaintext" data-lang="plaintext">.create table tablename (['date']: string, ['time']: string, ['edge-location']: string, 
['server-bytes']: int, ['client-ip']: string, ['client-method']: string, ['edge-fqdn']: string, 
['request-uri']: string, ['server-status']: int, ['client-referer']: string, 
['client-useragent']: string, ['request-uriquery']: string, ['client-cookie']: string, 
['edge-result']: string, ['edge-requestid']: string, ['server-fqdn']: string, 
['client-protocol']: string, ['client-bytes']: string, ['server-timetaken']: decimal, 
['client-forwardedfor']: string, ['client-tls']: string, ['client-tlscipher']: string, 
['edge-response']: string, ['client-protocolversion']: string, ['field-encryption']: string, 
['field-encryptionfields']: string, ['client-port']: string, ['server-timetofirstbyte']: string, 
['edge-errordetail']: string, ['server-contenttype']: string, ['server-contentlength']: string, 
['server-rangestart']: string, ['server-rangeend']: string)</code></pre></figure>

<p>Each of the columns above mapped directly to the 33 fields (included the new seven that were added in late December of 2019). I figured I would add it to the table schema so that if I wanted to ingest the data from the newer logs in the future, I would be able to.</p>

<p>With the database and the target table created, the next step was to build a pipeline in Data Factory to copy the data from S3 directly to the database in Data Explorer. A Data Factory (ADF) pipeline requires the configuration of <a href="https://learn.microsoft.com/azure/data-factory/concepts-linked-services?tabs=data-factory">Linked Services</a> for each service that you intend for the pipeline to interact with. In my case, I needed to create one for S3, and one for Data Explorer.</p>

<p>The configuration for the S3 Linked Service was not intuitive. In fact, I spent time trying to figure out the correct combination of parameters before I landed on a configuration that worked properly. I landed on the following configuration for my target S3 bucket:</p>

<figure class="highlight"><pre><code class="language-json" data-lang="json"><table class="rouge-table"><tbody><tr><td class="gutter gl"><pre class="lineno">1
2
3
4
5
6
7
8
9
10
11
12
13
14
15
16
17
18
19
20
21
</pre></td><td class="code"><pre><span class="w">  </span><span class="p">{</span><span class="w">                                                                                                                                                                             
    </span><span class="nl">"etag"</span><span class="p">:</span><span class="w"> </span><span class="s2">"redacted"</span><span class="p">,</span><span class="w">                                                                                                                             
    </span><span class="nl">"id"</span><span class="p">:</span><span class="w">  </span><span class="s2">"redacted"</span><span class="p">,</span><span class="w">                                                                                                                                                                               
    </span><span class="nl">"name"</span><span class="p">:</span><span class="w"> </span><span class="s2">"s3"</span><span class="p">,</span><span class="w">                                                                                                                                                               
    </span><span class="nl">"properties"</span><span class="p">:</span><span class="w"> </span><span class="p">{</span><span class="w">                                                                                                                                                             
      </span><span class="nl">"accessKeyId"</span><span class="p">:</span><span class="w">  </span><span class="s2">"redacted"</span><span class="p">,</span><span class="w">                                                                                                                                    
      </span><span class="nl">"additionalProperties"</span><span class="p">:</span><span class="w"> </span><span class="kc">null</span><span class="p">,</span><span class="w">                                                                                                                                             
      </span><span class="nl">"annotations"</span><span class="p">:</span><span class="w"> </span><span class="p">[],</span><span class="w">                                                                                                                                                        
      </span><span class="nl">"authenticationType"</span><span class="p">:</span><span class="w"> </span><span class="s2">"AccessKey"</span><span class="p">,</span><span class="w">                                                                                                                                        
      </span><span class="nl">"connectVia"</span><span class="p">:</span><span class="w"> </span><span class="kc">null</span><span class="p">,</span><span class="w">                                                                                                                                                       
      </span><span class="nl">"description"</span><span class="p">:</span><span class="w"> </span><span class="kc">null</span><span class="p">,</span><span class="w">                                                                                                                                                      
      </span><span class="nl">"encryptedCredential"</span><span class="p">:</span><span class="w">  </span><span class="s2">"redacted"</span><span class="p">,</span><span class="w">                                                
      </span><span class="nl">"parameters"</span><span class="p">:</span><span class="w"> </span><span class="kc">null</span><span class="p">,</span><span class="w">                                                                                                                                                       
      </span><span class="nl">"secretAccessKey"</span><span class="p">:</span><span class="w"> </span><span class="kc">null</span><span class="p">,</span><span class="w">                                                                                                                                                  
      </span><span class="nl">"serviceUrl"</span><span class="p">:</span><span class="w"> </span><span class="s2">"https://s3.amazonaws.com"</span><span class="p">,</span><span class="w">                                                                                                                                 
      </span><span class="nl">"sessionToken"</span><span class="p">:</span><span class="w"> </span><span class="kc">null</span><span class="p">,</span><span class="w">                                                                                                                                                     
      </span><span class="nl">"type"</span><span class="p">:</span><span class="w"> </span><span class="s2">"AmazonS3"</span><span class="w">                                                                                                                                                        
    </span><span class="p">},</span><span class="w">                                                                                                                                                                          
    </span><span class="nl">"resourceGroup"</span><span class="p">:</span><span class="w">  </span><span class="s2">"redacted"</span><span class="p">,</span><span class="w">                                                                                                                             
    </span><span class="nl">"type"</span><span class="p">:</span><span class="w"> </span><span class="s2">"Microsoft.DataFactory/factories/linkedservices"</span><span class="w">                                                                                                                    
  </span><span class="p">}</span><span class="err">,</span>
</pre></td></tr></tbody></table></code></pre></figure>

<p>The aspect of this configuration that I spent the most time on was with the serviceUrl (line 13). I had assumed I could use the FQDN of my target bucket but because of the way the dataset is configured in ADF, there is no way to specific the root path of the bucket resulting in a data retrieval failure. For this definition, all I needed to specify was the accessKeyId, the secretAccessKey (which is then encrypted), and ensure that the serviceUrl is set to https://s3.amazonaws.com.</p>

<p>The next step was to create a Linked Service for the target Data Explorer instance. The authentication options for the Data Explorer Linked Service are Service Principal, System Managed, and User Managed Identity. In this case, I created an Application SP without any API permissions, generated a client secret, and passed it into the Linked Service definition.</p>

<figure class="highlight"><pre><code class="language-json" data-lang="json"><span class="p">{</span><span class="w">                                                                                                                                                                               
  </span><span class="nl">"etag"</span><span class="p">:</span><span class="w"> </span><span class="s2">"redacted"</span><span class="p">,</span><span class="w">                                                                                                                               
  </span><span class="nl">"id"</span><span class="p">:</span><span class="w"> </span><span class="s2">"redacted"</span><span class="p">,</span><span class="w">                                                                                                                                                                       
  </span><span class="nl">"name"</span><span class="p">:</span><span class="w"> </span><span class="s2">"dataexplorer"</span><span class="p">,</span><span class="w">                                                                                                                                                       
  </span><span class="nl">"properties"</span><span class="p">:</span><span class="w"> </span><span class="p">{</span><span class="w">                                                                                                                                                               
    </span><span class="nl">"additionalProperties"</span><span class="p">:</span><span class="w"> </span><span class="kc">null</span><span class="p">,</span><span class="w">                                                                                                                                               
    </span><span class="nl">"annotations"</span><span class="p">:</span><span class="w"> </span><span class="p">[],</span><span class="w">                                                                                                                                                          
    </span><span class="nl">"connectVia"</span><span class="p">:</span><span class="w"> </span><span class="kc">null</span><span class="p">,</span><span class="w">                                                                                                                                                         
    </span><span class="nl">"credential"</span><span class="p">:</span><span class="w"> </span><span class="kc">null</span><span class="p">,</span><span class="w">                                                                                                                                                         
    </span><span class="nl">"database"</span><span class="p">:</span><span class="w"> </span><span class="s2">"primary"</span><span class="p">,</span><span class="w">                                                                                                                                                      
    </span><span class="nl">"description"</span><span class="p">:</span><span class="w"> </span><span class="kc">null</span><span class="p">,</span><span class="w">                                                                                                                                                        
    </span><span class="nl">"endpoint"</span><span class="p">:</span><span class="w"> </span><span class="s2">"redacted"</span><span class="p">,</span><span class="w">                                                                                                                   
    </span><span class="nl">"parameters"</span><span class="p">:</span><span class="w"> </span><span class="kc">null</span><span class="p">,</span><span class="w">                                                                                                                                                         
    </span><span class="nl">"servicePrincipalId"</span><span class="p">:</span><span class="w"> </span><span class="s2">"redacted"</span><span class="p">,</span><span class="w">                                                                                                               
    </span><span class="nl">"servicePrincipalKey"</span><span class="p">:</span><span class="w"> </span><span class="kc">null</span><span class="p">,</span><span class="w">                                                                                                                                                
    </span><span class="nl">"tenant"</span><span class="p">:</span><span class="w"> </span><span class="s2">"redacted"</span><span class="p">,</span><span class="w">                                                                                                                           
    </span><span class="nl">"type"</span><span class="p">:</span><span class="w"> </span><span class="s2">"AzureDataExplorer"</span><span class="w">                                                                                                                                                 
  </span><span class="p">},</span><span class="w">                                                                                                                                                                            
  </span><span class="nl">"resourceGroup"</span><span class="p">:</span><span class="w"> </span><span class="s2">"redacted"</span><span class="p">,</span><span class="w">                                                                                                                               
  </span><span class="nl">"type"</span><span class="p">:</span><span class="w"> </span><span class="s2">"Microsoft.DataFactory/factories/linkedservices"</span><span class="w">           
</span><span class="p">}</span><span class="w">                                                                                                                                 </span></code></pre></figure>

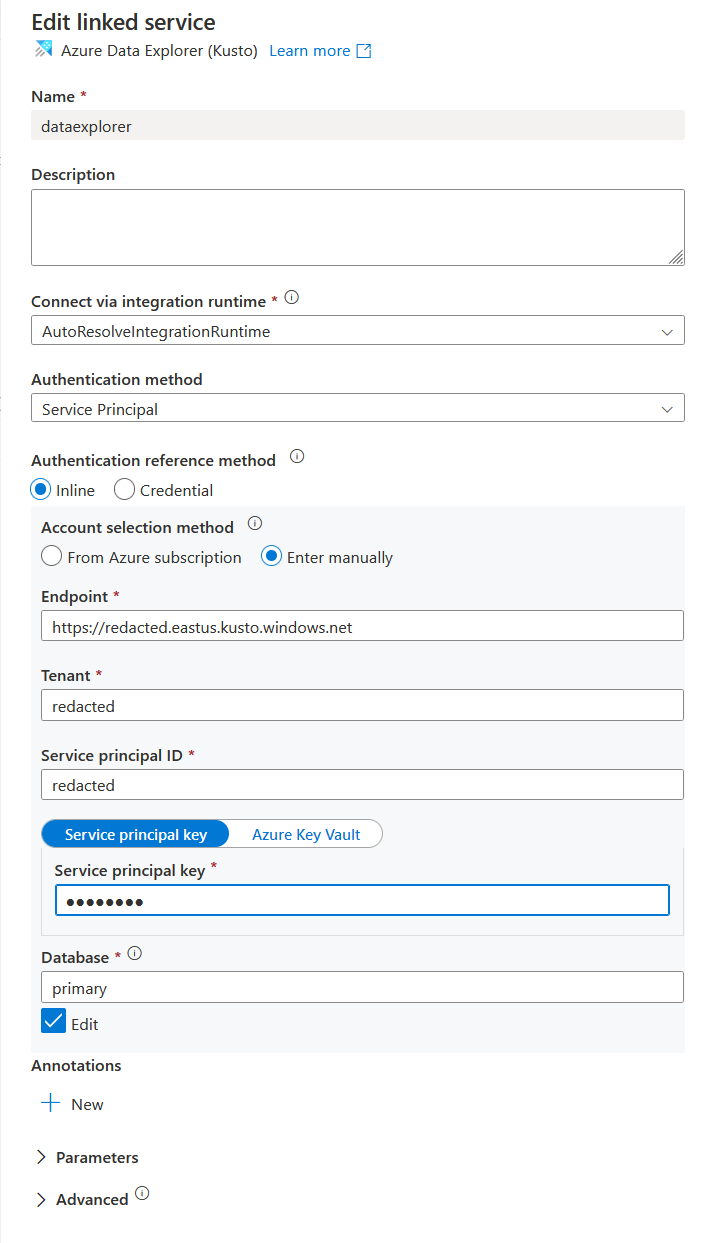
<p>The JSON above doesn’t provide enough visual context, whereas the screenshot below is more clear.</p>

<figure class="figure  figure-frame">
    <img class="figure_image" src="/assets/posts/2023/adf-linkedservice-dataexplorer.png" />
    
</figure>

<p>ADF also has a feature to manage credentials for a Linked Service through the <strong>Authentication reference method</strong> that includes two radio buttons: one for inline (which is what I’m using) and the other for Credential - Eventually, I’ll migrate the inline to Credential so that I can manage the lifecycle a bit better.</p>

<p>Once both Linked Services were created, I could move on to defining the source and destination datasets. A <a href="https://learn.microsoft.com/azure/data-factory/concepts-datasets-linked-services?tabs=data-factory">Dataset</a> in ADF is an object referring to and mapping that data that will be sourced or targeted. For my use case, I had two dataset objects, one for the S3 bucket, and one for the Data Explorer table that would contain the ingested the data.</p>

<p>Configuring the source dataset required a bit of exploration as the logs in my bucket are several years old, and I was curious how much the data varied over time. Comparing my data to the <a href="https://docs.aws.amazon.com/AmazonCloudFront/latest/DeveloperGuide/AccessLogs.html#LogFileFormat">schema</a> for the logs provided by Amazon, I noticed that the older data didn’t match. In fact, the schema for the older log files were missing seven fields. After a quick search, I discovered an Amazon <a href="https://aws.amazon.com/about-aws/whats-new/2019/12/cloudfront-detailed-logs/">blog</a> announcing the release of the new fields as of December 2019. I decided that it wasn’t worth for me to ingest the new fields, so I defined the schema for the source dataset to the original 26 values.</p>

<p>Each of the log file starts with the following two lines:</p>

<figure class="highlight"><pre><code class="language-plaintext" data-lang="plaintext">#Version: 1.0                                                                                                                                                                  
#Fields: date time x-edge-location sc-bytes c-ip cs-method cs(Host) cs-uri-stem sc-status cs(Referer) cs(User-Agent) cs-uri-query cs(Cookie) x-edge-result-type x-edge-request-id x-host-header cs-protocol cs-bytes time-taken x-forwarded-for ssl-protocol ssl-cipher x-edge-response-result-type cs-protocol-version fle-status fle-encrypted-fields</code></pre></figure>

<p>Ideally, I wanted to use the headers defined for each column specified in the second line, but because the line was prepend with <em>#Fields:</em>, it presented a problem for the schema parser (at least to my novice eyes). I decided to set the source dataset to skip the first two lines of each file, and to manually define the schema. In addition, I had to specify that the data was compressed using GZip, using the optimal compression level. The JSON definition for the source dataset is:</p>

<figure class="highlight"><pre><code class="language-json" data-lang="json"><span class="w">  </span><span class="nl">"name"</span><span class="p">:</span><span class="w"> </span><span class="s2">"redacted"</span><span class="err">,</span><span class="w">         
  </span><span class="nl">"properties"</span><span class="p">:</span><span class="w"> </span><span class="p">{</span><span class="w">                      
    </span><span class="nl">"additionalProperties"</span><span class="p">:</span><span class="w"> </span><span class="kc">null</span><span class="p">,</span><span class="w">      
    </span><span class="nl">"annotations"</span><span class="p">:</span><span class="w"> </span><span class="kc">null</span><span class="p">,</span><span class="w">               
    </span><span class="nl">"columnDelimiter"</span><span class="p">:</span><span class="w"> </span><span class="s2">"</span><span class="se">\t</span><span class="s2">"</span><span class="p">,</span><span class="w">           
    </span><span class="nl">"compressionCodec"</span><span class="p">:</span><span class="w"> </span><span class="s2">"gzip"</span><span class="p">,</span><span class="w">        
    </span><span class="nl">"compressionLevel"</span><span class="p">:</span><span class="w"> </span><span class="s2">"Optimal"</span><span class="p">,</span><span class="w">     
    </span><span class="nl">"description"</span><span class="p">:</span><span class="w"> </span><span class="kc">null</span><span class="p">,</span><span class="w">               
    </span><span class="nl">"encodingName"</span><span class="p">:</span><span class="w"> </span><span class="kc">null</span><span class="p">,</span><span class="w">              
    </span><span class="nl">"escapeChar"</span><span class="p">:</span><span class="w"> </span><span class="s2">"</span><span class="se">\\</span><span class="s2">"</span><span class="p">,</span><span class="w">                
    </span><span class="nl">"firstRowAsHeader"</span><span class="p">:</span><span class="w"> </span><span class="kc">false</span><span class="p">,</span><span class="w">         
    </span><span class="nl">"folder"</span><span class="p">:</span><span class="w"> </span><span class="kc">null</span><span class="p">,</span><span class="w">                    
    </span><span class="nl">"linkedServiceName"</span><span class="p">:</span><span class="w"> </span><span class="p">{</span><span class="w">             
      </span><span class="nl">"parameters"</span><span class="p">:</span><span class="w"> </span><span class="kc">null</span><span class="p">,</span><span class="w">              
      </span><span class="nl">"referenceName"</span><span class="p">:</span><span class="w"> </span><span class="s2">"s3"</span><span class="p">,</span><span class="w">           
      </span><span class="nl">"type"</span><span class="p">:</span><span class="w"> </span><span class="s2">"LinkedServiceReference"</span><span class="w"> 
    </span><span class="p">},</span><span class="w">                                 
    </span><span class="nl">"location"</span><span class="p">:</span><span class="w"> </span><span class="p">{</span><span class="w">                      
      </span><span class="nl">"additionalProperties"</span><span class="p">:</span><span class="w"> </span><span class="kc">null</span><span class="p">,</span><span class="w">    
      </span><span class="nl">"bucketName"</span><span class="p">:</span><span class="w"> </span><span class="s2">"redacted"</span><span class="p">,</span><span class="w">
      </span><span class="nl">"fileName"</span><span class="p">:</span><span class="w"> </span><span class="kc">null</span><span class="p">,</span><span class="w">                
      </span><span class="nl">"folderPath"</span><span class="p">:</span><span class="w"> </span><span class="kc">null</span><span class="p">,</span><span class="w">              
      </span><span class="nl">"type"</span><span class="p">:</span><span class="w"> </span><span class="s2">"AmazonS3Location"</span><span class="p">,</span><span class="w">      
      </span><span class="nl">"version"</span><span class="p">:</span><span class="w"> </span><span class="kc">null</span><span class="w">                  
    </span><span class="p">},</span><span class="w">                                 
    </span><span class="nl">"nullValue"</span><span class="p">:</span><span class="w"> </span><span class="kc">null</span><span class="p">,</span><span class="w">                 
    </span><span class="nl">"parameters"</span><span class="p">:</span><span class="w"> </span><span class="kc">null</span><span class="p">,</span><span class="w">                
    </span><span class="nl">"quoteChar"</span><span class="p">:</span><span class="w"> </span><span class="s2">"</span><span class="se">\"</span><span class="s2">"</span><span class="p">,</span><span class="w">                 
    </span><span class="nl">"rowDelimiter"</span><span class="p">:</span><span class="w"> </span><span class="kc">null</span><span class="p">,</span><span class="w">
    </span><span class="nl">"structure"</span><span class="p">:</span><span class="w"> </span><span class="kc">null</span><span class="p">,</span><span class="w">
    </span><span class="nl">"type"</span><span class="p">:</span><span class="w"> </span><span class="s2">"DelimitedText"</span><span class="w">
	</span></code></pre></figure>

<p>A few notes:</p>
<ul>
  <li>The linkedServiceName includes the LinkedService that I defined earlier</li>
  <li>The bucketName in the location block is the simple value of the bucket without being prepended with https:// or s3://, or appended with the traditional s3 FQDN values.</li>
  <li>The column delimiter is specified as a <em>tab</em> character</li>
  <li>The type is defined as DelimitedText</li>
</ul>

<p>The schema block immediately following the rowDelimiter key started as specified below:</p>

<figure class="highlight"><pre><code class="language-json" data-lang="json"><span class="w">    </span><span class="nl">"schema"</span><span class="p">:</span><span class="w"> </span><span class="p">[</span><span class="w">         
      </span><span class="p">{</span><span class="w">                 
        </span><span class="nl">"type"</span><span class="p">:</span><span class="w"> </span><span class="s2">"String"</span><span class="w">
      </span><span class="p">},</span><span class="w">                </span></code></pre></figure>

<p>The String definition was defined a total of 26 times.</p>

<p>Once the source dataset was complete, I could move to the destination dataset. As for the source, this dataset also included a reference to the appropriate LinkedService (in this case dataexplorer).</p>

<figure class="highlight"><pre><code class="language-json" data-lang="json"><span class="w">  </span><span class="nl">"name"</span><span class="p">:</span><span class="w"> </span><span class="s2">"redacted"</span><span class="err">,</span><span class="w">   
  </span><span class="nl">"properties"</span><span class="p">:</span><span class="w"> </span><span class="p">{</span><span class="w">                     
    </span><span class="nl">"additionalProperties"</span><span class="p">:</span><span class="w"> </span><span class="kc">null</span><span class="p">,</span><span class="w">     
    </span><span class="nl">"annotations"</span><span class="p">:</span><span class="w"> </span><span class="kc">null</span><span class="p">,</span><span class="w">              
    </span><span class="nl">"description"</span><span class="p">:</span><span class="w"> </span><span class="kc">null</span><span class="p">,</span><span class="w">              
    </span><span class="nl">"folder"</span><span class="p">:</span><span class="w"> </span><span class="kc">null</span><span class="p">,</span><span class="w">                   
    </span><span class="nl">"linkedServiceName"</span><span class="p">:</span><span class="w"> </span><span class="p">{</span><span class="w">            
      </span><span class="nl">"parameters"</span><span class="p">:</span><span class="w"> </span><span class="kc">null</span><span class="p">,</span><span class="w">             
      </span><span class="nl">"referenceName"</span><span class="p">:</span><span class="w"> </span><span class="s2">"dataexplorer"</span><span class="p">,</span><span class="w">
      </span><span class="nl">"type"</span><span class="p">:</span><span class="w"> </span><span class="s2">"LinkedServiceReference"</span><span class="w">
    </span><span class="p">},</span><span class="w">                                
    </span><span class="nl">"parameters"</span><span class="p">:</span><span class="w"> </span><span class="kc">null</span><span class="w">
	</span></code></pre></figure>

<p>The last piece of this dataset block was the following definition at the end of the JSON:</p>

<figure class="highlight"><pre><code class="language-json" data-lang="json"><span class="nl">"structure"</span><span class="p">:</span><span class="w"> </span><span class="kc">null</span><span class="err">,</span><span class="w">              
</span><span class="nl">"table"</span><span class="p">:</span><span class="w"> </span><span class="s2">"redacted"</span><span class="err">,</span><span class="w">    
</span><span class="nl">"type"</span><span class="p">:</span><span class="w"> </span><span class="s2">"AzureDataExplorerTable"</span></code></pre></figure>

<p>Compared to the source dataset, the type for this dataset is defined as <em>AzureDataExplorerTable</em>. The only other parameter that’s defined in this block is the one for the target table in the database.</p>

<p>With the prerequisites for the pipeline created and configured, the next step was to build the pipeline and define the step inside of it to copy the data. For the first dozen times that I stepped through this process, I used the various wizards and found them to be more complicated (and frustrating) compared to defining each of the components individually. With all of the components defined, it was straight forward to build the pipeline.</p>

<p>A <a href="https://learn.microsoft.com/azure/data-factory/concepts-pipelines-activities?tabs=data-factory#overview">Data Factory Pipeline</a> is simply a grouping of activities. For this case, my pipeline only has one <a href="https://learn.microsoft.com/azure/data-factory/copy-activity-overview">copy activity</a> which uses the previously defined source dataset as the input, and the destination dataset as the output. The JSON to define the source reference is as shown below:</p>

<figure class="highlight"><pre><code class="language-json" data-lang="json"><table class="rouge-table"><tbody><tr><td class="gutter gl"><pre class="lineno">1
2
3
4
5
6
7
8
9
10
11
12
13
14
15
16
17
18
19
20
21
22
23
24
25
26
27
28
29
30
31
32
33
34
35
36
37
</pre></td><td class="code"><pre><span class="w">        </span><span class="nl">"source"</span><span class="p">:</span><span class="w"> </span><span class="p">{</span><span class="w">
          </span><span class="nl">"additionalColumns"</span><span class="p">:</span><span class="w"> </span><span class="kc">null</span><span class="p">,</span><span class="w">
          </span><span class="nl">"additionalProperties"</span><span class="p">:</span><span class="w"> </span><span class="kc">null</span><span class="p">,</span><span class="w">
          </span><span class="nl">"disableMetricsCollection"</span><span class="p">:</span><span class="w"> </span><span class="kc">null</span><span class="p">,</span><span class="w">
          </span><span class="nl">"formatSettings"</span><span class="p">:</span><span class="w"> </span><span class="p">{</span><span class="w">
            </span><span class="nl">"additionalProperties"</span><span class="p">:</span><span class="w"> </span><span class="kc">null</span><span class="p">,</span><span class="w">
            </span><span class="nl">"compressionProperties"</span><span class="p">:</span><span class="w"> </span><span class="kc">null</span><span class="p">,</span><span class="w">
            </span><span class="nl">"skipLineCount"</span><span class="p">:</span><span class="w"> </span><span class="s2">"2"</span><span class="p">,</span><span class="w">
            </span><span class="nl">"type"</span><span class="p">:</span><span class="w"> </span><span class="s2">"DelimitedTextReadSettings"</span><span class="w">
          </span><span class="p">},</span><span class="w">
          </span><span class="nl">"maxConcurrentConnections"</span><span class="p">:</span><span class="w"> </span><span class="kc">null</span><span class="p">,</span><span class="w">
          </span><span class="nl">"sourceRetryCount"</span><span class="p">:</span><span class="w"> </span><span class="kc">null</span><span class="p">,</span><span class="w">
          </span><span class="nl">"sourceRetryWait"</span><span class="p">:</span><span class="w"> </span><span class="kc">null</span><span class="p">,</span><span class="w">
          </span><span class="nl">"storeSettings"</span><span class="p">:</span><span class="w"> </span><span class="p">{</span><span class="w">
            </span><span class="nl">"additionalProperties"</span><span class="p">:</span><span class="w"> </span><span class="kc">null</span><span class="p">,</span><span class="w">
            </span><span class="nl">"deleteFilesAfterCompletion"</span><span class="p">:</span><span class="w"> </span><span class="kc">null</span><span class="p">,</span><span class="w">
            </span><span class="nl">"disableMetricsCollection"</span><span class="p">:</span><span class="w"> </span><span class="kc">null</span><span class="p">,</span><span class="w">
            </span><span class="nl">"enablePartitionDiscovery"</span><span class="p">:</span><span class="w"> </span><span class="kc">false</span><span class="p">,</span><span class="w">
            </span><span class="nl">"fileListPath"</span><span class="p">:</span><span class="w"> </span><span class="kc">null</span><span class="p">,</span><span class="w">
            </span><span class="nl">"maxConcurrentConnections"</span><span class="p">:</span><span class="w"> </span><span class="kc">null</span><span class="p">,</span><span class="w">
            </span><span class="nl">"modifiedDatetimeEnd"</span><span class="p">:</span><span class="w"> </span><span class="p">{</span><span class="w">
              </span><span class="nl">"type"</span><span class="p">:</span><span class="w"> </span><span class="s2">"Expression"</span><span class="p">,</span><span class="w">
              </span><span class="nl">"value"</span><span class="p">:</span><span class="w"> </span><span class="s2">"@startOfDay(utcnow())"</span><span class="w">
            </span><span class="p">},</span><span class="w">
            </span><span class="nl">"modifiedDatetimeStart"</span><span class="p">:</span><span class="w"> </span><span class="p">{</span><span class="w">
              </span><span class="nl">"type"</span><span class="p">:</span><span class="w"> </span><span class="s2">"Expression"</span><span class="p">,</span><span class="w">
              </span><span class="nl">"value"</span><span class="p">:</span><span class="w"> </span><span class="s2">"@startOfDay(getPastTime(1, 'Day'))</span><span class="se">\n</span><span class="s2">"</span><span class="w">
            </span><span class="p">},</span><span class="w">
            </span><span class="nl">"partitionRootPath"</span><span class="p">:</span><span class="w"> </span><span class="kc">null</span><span class="p">,</span><span class="w">
            </span><span class="nl">"prefix"</span><span class="p">:</span><span class="w"> </span><span class="kc">null</span><span class="p">,</span><span class="w">
            </span><span class="nl">"recursive"</span><span class="p">:</span><span class="w"> </span><span class="kc">true</span><span class="p">,</span><span class="w">
            </span><span class="nl">"type"</span><span class="p">:</span><span class="w"> </span><span class="s2">"AmazonS3ReadSettings"</span><span class="p">,</span><span class="w">
            </span><span class="nl">"wildcardFileName"</span><span class="p">:</span><span class="w"> </span><span class="s2">""</span><span class="p">,</span><span class="w">
            </span><span class="nl">"wildcardFolderPath"</span><span class="p">:</span><span class="w"> </span><span class="kc">null</span><span class="w">
          </span><span class="p">},</span><span class="w">
          </span><span class="nl">"type"</span><span class="p">:</span><span class="w"> </span><span class="s2">"DelimitedTextSource"</span><span class="w">
        </span><span class="p">}</span>
</pre></td></tr></tbody></table></code></pre></figure>

<p>The most important components in this block are that I used a * for the wildcardFileName key in line 33, and that I defined a function for the start (line 23) and end times (line 27) for the file modified timestamps. This would enable me to run the pipeline once a day without changing any parameters programmatically, and ingest only the logs from the day before without risk of duplication.</p>

<p>The next section of the copy activity was the sink (or target) configuration. Again, as for the source, this was as simple as selected the destination dataset. The JSON for the sink is as below:</p>

<figure class="highlight"><pre><code class="language-json" data-lang="json"><span class="w">        </span><span class="nl">"sink"</span><span class="p">:</span><span class="w"> </span><span class="p">{</span><span class="w">
          </span><span class="nl">"additionalProperties"</span><span class="p">:</span><span class="w"> </span><span class="kc">null</span><span class="p">,</span><span class="w">
          </span><span class="nl">"disableMetricsCollection"</span><span class="p">:</span><span class="w"> </span><span class="kc">null</span><span class="p">,</span><span class="w">
          </span><span class="nl">"flushImmediately"</span><span class="p">:</span><span class="w"> </span><span class="kc">null</span><span class="p">,</span><span class="w">
          </span><span class="nl">"ingestionMappingAsJson"</span><span class="p">:</span><span class="w"> </span><span class="kc">null</span><span class="p">,</span><span class="w">
          </span><span class="nl">"ingestionMappingName"</span><span class="p">:</span><span class="w"> </span><span class="kc">null</span><span class="p">,</span><span class="w">
          </span><span class="nl">"maxConcurrentConnections"</span><span class="p">:</span><span class="w"> </span><span class="kc">null</span><span class="p">,</span><span class="w">
          </span><span class="nl">"sinkRetryCount"</span><span class="p">:</span><span class="w"> </span><span class="kc">null</span><span class="p">,</span><span class="w">
          </span><span class="nl">"sinkRetryWait"</span><span class="p">:</span><span class="w"> </span><span class="kc">null</span><span class="p">,</span><span class="w">
          </span><span class="nl">"type"</span><span class="p">:</span><span class="w"> </span><span class="s2">"AzureDataExplorerSink"</span><span class="p">,</span><span class="w">
          </span><span class="nl">"writeBatchSize"</span><span class="p">:</span><span class="w"> </span><span class="kc">null</span><span class="p">,</span><span class="w">
          </span><span class="nl">"writeBatchTimeout"</span><span class="p">:</span><span class="w"> </span><span class="kc">null</span><span class="w">
        </span><span class="p">}</span></code></pre></figure>

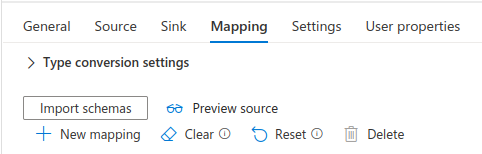
<p>As you can see, other than the type being auto-populated, the pipeline is simply going to use the destination dataset defined in the output. Once the sink was defined, the next configuration section for the copy activity was to define the mapping between the source and the destination. For this definition, as I was configuring the pipeline using the UI, I clicked on the <em>Import Schemas</em> button and crossed my fingers.</p>

<figure class="figure  figure-frame">
    <img class="figure_image" src="/assets/posts/2023/adf-pipeline-mapping.png" />
    
</figure>

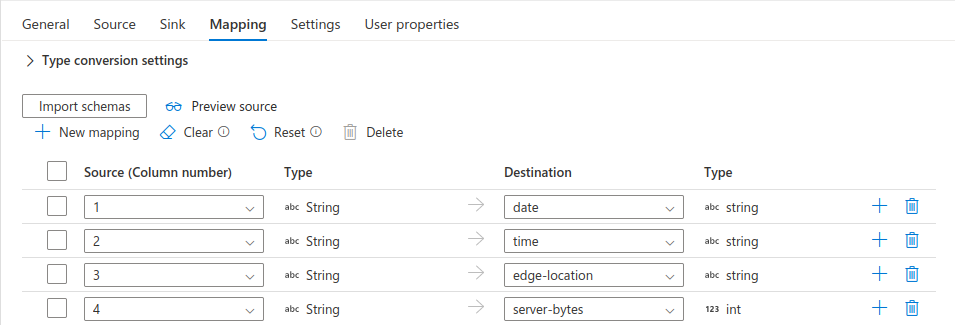
<p>After waiting for about a minute, I was greeted with an update to the UI that presented the schema mapping exactly as I intended.</p>

<figure class="figure  figure-frame">
    <img class="figure_image" src="/assets/posts/2023/adf-pipeline-schema.png" />
    
</figure>

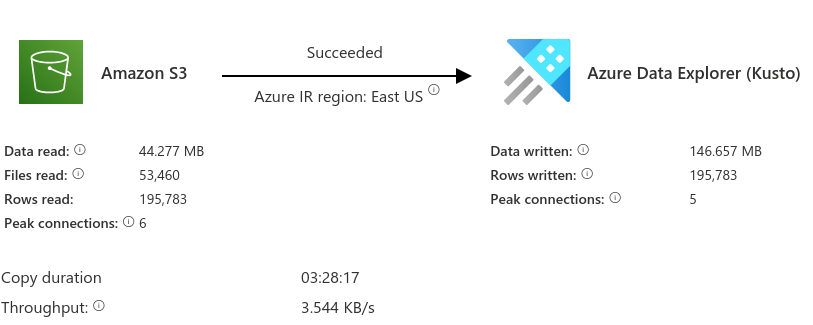
<p>This was it! 🥳 I left the remaining settings as their default, and manually triggered the pipeline. I waited patiently (for almost three and a half hours) until the pipeline was complete…</p>

<figure class="figure  figure-frame">
    <img class="figure_image" src="/assets/posts/2023/adf-pipeline-success.png" />
    
</figure>

<p>I really couldn’t believe that after working on building this out for a couple of weeks that the pipeline succeeded, and that the data was now available for me to query in Data Explorer using KQL.</p>

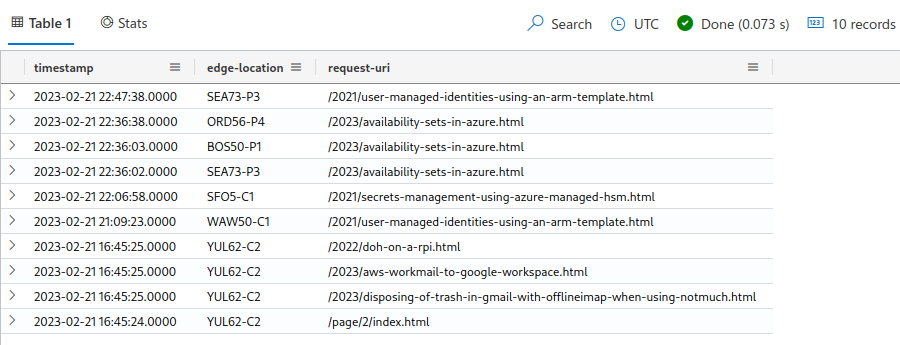
<p>For example, if I wanted to see the latest ten records sorted by timestamp of non-bots (at least from their user agent strings) of request to html content, I could make the following query:</p>

<figure class="highlight"><pre><code class="language-sql" data-lang="sql"><span class="n">tablename</span>
<span class="o">|</span> <span class="n">extend</span> <span class="nb">timestamp</span> <span class="o">=</span> <span class="n">todatetime</span><span class="p">(</span><span class="n">strcat</span><span class="p">([</span><span class="s1">'date'</span><span class="p">],</span> <span class="s1">'T'</span><span class="p">,</span> <span class="p">[</span><span class="s1">'time'</span><span class="p">]))</span>
<span class="o">|</span> <span class="k">where</span> <span class="p">[</span><span class="s1">'client-useragent'</span><span class="p">]</span> <span class="o">!</span><span class="k">contains</span> <span class="s1">'bot'</span>
<span class="o">|</span> <span class="k">where</span> <span class="p">[</span><span class="s1">'request-uri'</span><span class="p">]</span> <span class="k">contains</span> <span class="s1">'html'</span>
<span class="o">|</span> <span class="n">sort</span> <span class="k">by</span> <span class="nb">timestamp</span> <span class="k">desc</span>
<span class="o">|</span> <span class="k">limit</span> <span class="mi">10</span>
<span class="o">|</span> <span class="n">project</span> <span class="nb">timestamp</span><span class="p">,</span> <span class="p">[</span><span class="s1">'edge-location'</span><span class="p">],[</span><span class="s1">'request-uri'</span><span class="p">]</span></code></pre></figure>

<p>The result from the query is presented to me in 73 ms.</p>

<figure class="figure  figure-frame">
    <img class="figure_image" src="/assets/posts/2023/kql-bloglog-example.png" />
    
</figure>

<p>The best part about this solution is that it doesn’t require any additional JavaScript to be imported into the client’s browser. The data logged is from the HTTP requests sent to CloudFront which is providing the CDN ahead of the S3 bucket where this blog is being hosted.</p>

<p>If you made it this far, thank you! I really enjoyed putting this solution together. I learned a ton through the process about services in Azure that I never spent time with before. As I continue building queries and better reporting from the data, I’ll follow up with another post comparing the quality of the data to that which I typically see from Google Analytics.</p>]]></content><author><name>Armen Kaleshian</name><email>armen@kriation.com</email></author><category term="google-analytics" /><category term="azure-datafactory" /><category term="azure-dataexplorer" /><category term="amazon s3" /><category term="amazon cloudfront" /><summary type="html"><![CDATA[Late last year, a blogger that I follow posted their journey of building their own site analytics as a replacement for Google Analytics (GA). In addition, Google announced deprecation of Universal Analytics. These two events triggered my desire to roll this site off of GA. Over the past couple of weeks, I built my own analytics “solution” using Azure Data Factory and Data Explorer. In this post, I’ll describe the process of ingesting CloudFront log data from S3 to Data Explorer using Data Factory.]]></summary></entry><entry><title type="html">Disposing of trash in Gmail with offlineimap when using notmuch</title><link href="https://blog.kriation.com/2023/disposing-of-trash-in-gmail-with-offlineimap-when-using-notmuch.html" rel="alternate" type="text/html" title="Disposing of trash in Gmail with offlineimap when using notmuch" /><published>2023-01-31T00:00:00-05:00</published><updated>2023-01-31T00:00:00-05:00</updated><id>https://blog.kriation.com/2023/disposing-of-trash-in-gmail-with-offlineimap-when-using-notmuch</id><content type="html" xml:base="https://blog.kriation.com/2023/disposing-of-trash-in-gmail-with-offlineimap-when-using-notmuch.html"><![CDATA[<p>More than five years ago, I decided that I wanted a terminal based e-mail management solution for the half a dozen e-mail addresses I read on any given day. My requirements were a unified inbox, tagging, and offline synchronization using imap. After testing a variety of solutions, I landed on a combination that satisfied my requirements, except for deleting e-mail from Gmail. Over the last two weeks, I finally found a solution that works reliably. In this post, I’ll describe my research, and how I  designed a solution that met my needs.</p>

<p>Given that <a href="https://www.mutt.org/">mutt</a> is the industry standard for an open-source terminal based e-mail client, I knew that I wanted to use it as my point of user interaction with my e-mail.  My second requirement was a unified inbox, parallel to my interaction in <a href="https://k9mail.app/">K-9 Mail</a> preventing the need to navigate from inbox to inbox for new e-mail. After researching solutions, the one that was frequently returned in my search results was <a href="https://notmuchmail.org/">Notmuch</a>. Notmuch is an incredibly fast, full text searchable system for e-mail. Its frontend is an API and a collection of CLI tools which absolutely exceeds my requirements. Once I decided that I was going to use notmuch, I looked for an integration with mutt, and discovered that it wasn’t as clean as I hoped. I researched further and discovered <a href="https://neomutt.org/">NeoMutt</a>! The integration between the two was built in 2016 and includes <a href="https://neomutt.org/feature/notmuch">virtual folders</a>, which solves my unified inbox requirement. The last requirement was the ability to sync each complete e-mail account locally, do what I need to do with it, and then “push” the changes back up when I’m done. This makes e-mail management an activity that happens a couple of times a day, versus real-time (which is an incredible distraction).</p>

<p>I spent a considerable amount of time configuring each of the tools to work together, and generally, my workflow is as easy as the one I use on my mobile with <a href="https://k9mail.app/">K-9 Mail</a>. On a regulas basis, I pull e-mail down from each of the accounts on my mobile (when on the move), review all of the new mail in a single unified inbox, and then mark for follow-up (and archive), archive, or delete, achieving “<a href="https://wikipedia.org/wiki/Merlin_Mann#Writing">Inbox Zero</a>”.</p>

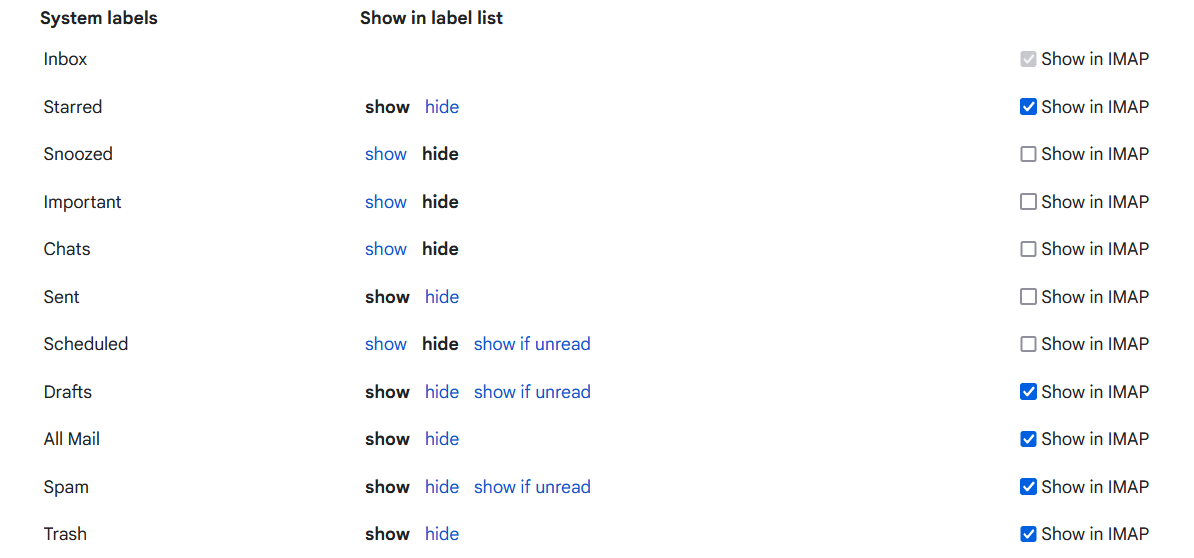
<p>The issue I had with the solution was how Google implemented IMAP for their e-mail product. Through the support of various IMAP extensions, they were able to dynamically build IMAP folders from their <a href="https://developers.google.com/gmail/imap/imap-extensions#special-use_extension_of_the_list_command">special labels</a> as well as labels that a user creates through the UI. For example, an excerpt of the system labels:</p>

<figure class="figure  figure-frame">
    <img class="figure_image" src="/assets/posts/2023/gmail-imap-labels.png" />
    
</figure>

<p>The challenge with this implementation is that any and all mail delivered to a given address is stored in All Mail unless explicitly <a href="https://www.rfc-editor.org/rfc/rfc3501#section-6.4.3">expunged</a> (a.k.a. deleted). <a href="https://github.com/OfflineIMAP/offlineimap3/blob/master/offlineimap/folder/Gmail.py#L30">Research</a> by the offlineimap team determined that to delete an e-mail completely from Gmail, it needs to be “moved” to Trash and deleted from all other folders.</p>

<p>Were you able to figure the problem out?</p>

<p>If not, I’ll help.</p>

<ul>
  <li>Gmail only uses one folder, and adds labels to each piece of correspondence indicating its folder</li>
  <li>Standard IMAP protocol only understands folders</li>
</ul>

<p>Because of these two conditions, offlineimap pulls the same message for every folder that it exists in and saves it as a seperate file.</p>

<figure class="figure  figure-frame">
    <img class="figure_image" src="/assets/posts/2023/local-notmuch-duplicate.png" />
    
</figure>

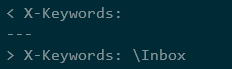
<p>Note that the same piece of correspondence has two records; one in inbox, and one in archive. If I run a diff on both files, the output is the following:</p>

<figure class="figure  figure-frame">
    <img class="figure_image" src="/assets/posts/2023/gmail-diff.png" />
    
</figure>

<p>The only difference is that the entry in the ‘All Mail’ folder has an \Inbox keyword, compared to the record in the Inbox folder having no labels at all. This now became a relatively simple search and replace problem that could be solved on the command line with one of my favorite tools, sed. I put together a list of steps that the script needed to take.</p>

<figure class="highlight"><pre><code class="language-bash" data-lang="bash"><span class="c"># Steps required to properly delete e-mail via IMAP (not JMAP) from GMail</span>
<span class="c"># supported accounts, which also includes accounts hosted through Google</span>
<span class="c"># Workspace</span>
<span class="c"># </span>
<span class="c"># Assumptions, using offlineimap v8.0.0 with imaplib2 v3.0.6 and notmuch v0.37</span>
<span class="c"># E-mails to be deleted are tagged with 'trash'</span>
<span class="c"># 1. Find e-mail files that are not currently in trash and are tagged trash</span>
<span class="c"># 2. Delete any records of each that are in folders other than archive</span>
<span class="c"># 3. Remove all X-Keywords from records that are in archive</span>
<span class="c"># 4. Remove MAILDIR hash from filename</span>
<span class="c"># 5. Move the result to the corresponding trash folder in the correct account</span></code></pre></figure>

<p>Once I had the steps down, it became a development effort. A couple of loops, variables, and a lovely set of <a href="https://www.gnu.org/software/bash/manual/html_node/Shell-Parameter-Expansion.html">Shell Parameter Expansion</a> techniques later, (kudos to <a href="https://github.com/hsanson">@hsanson</a> with their <a href="https://github.com/neomutt/neomutt/issues/1975#issuecomment-669181335">comment</a> in a neomutt thread discussing a similar issue that they had solved), I built out the following:</p>

<figure class="highlight"><pre><code class="language-bash" data-lang="bash"><table class="rouge-table"><tbody><tr><td class="gutter gl"><pre class="lineno">1
2
3
4
5
6
7
8
9
10
11
12
13
14
15
16
17
18
19
20
21
22
</pre></td><td class="code"><pre><span class="c"># Tidy to Trash</span>
<span class="k">for </span>i <span class="k">in</span> <span class="si">$(</span>notmuch search <span class="nt">--output</span><span class="o">=</span>messages not path:/trash/ and tag:trash<span class="si">)</span>
  <span class="k">do 
    for </span>j <span class="k">in</span> <span class="si">$(</span>notmuch search <span class="nt">--output</span><span class="o">=</span>files tag:trash and <span class="nv">$i</span><span class="si">)</span>
      <span class="k">do 
        </span><span class="nv">ACCOUNT</span><span class="o">=</span><span class="si">$(</span><span class="nb">echo</span> <span class="nv">$j</span> | <span class="nb">awk</span> <span class="nt">-F</span>/ <span class="s1">'{print $5}'</span><span class="si">)</span>
        <span class="nv">DIR</span><span class="o">=</span><span class="si">$(</span><span class="nb">echo</span> <span class="nv">$j</span> | <span class="nb">awk</span> <span class="nt">-F</span>/ <span class="s1">'{print $6}'</span><span class="si">)</span>
        <span class="k">if</span> <span class="o">[</span> <span class="nv">$DIR</span> <span class="o">!=</span> <span class="s1">'archive'</span> <span class="o">]</span>
        <span class="k">then</span> 
          /usr/bin/systemd-cat <span class="nb">echo</span> <span class="s2">"Remove </span><span class="nv">$j</span><span class="s2"> in </span><span class="nv">$DIR</span><span class="s2">"</span>
          <span class="nb">rm</span> <span class="nv">$j</span>
        <span class="k">elif</span> <span class="o">[</span> <span class="nv">$DIR</span> <span class="o">==</span> <span class="s1">'archive'</span> <span class="o">]</span>
        <span class="k">then</span>
          /usr/bin/systemd-cat <span class="nb">echo</span> <span class="s2">"Remove X-Keywords from </span><span class="nv">$j</span><span class="s2">"</span>
          <span class="nb">sed</span> <span class="nt">-in</span> <span class="s1">'s/X-Keywords.*/X-Keywords:/g'</span> <span class="nv">$j</span>
          <span class="nv">FILE</span><span class="o">=</span><span class="k">${</span><span class="nv">j</span><span class="p">##*/</span><span class="k">}</span>
          <span class="nv">FILE_NOUID</span><span class="o">=</span><span class="k">${</span><span class="nv">FILE</span><span class="p">/,U=[0-9]*</span>:/:<span class="k">}</span>
          <span class="nv">FILE_NOUID</span><span class="o">=</span><span class="k">${</span><span class="nv">FILE_NOUID</span><span class="p">/,U=0-9]*/</span><span class="k">}</span>
          /usr/bin/systemd-cat <span class="nb">mv</span> <span class="nt">-uv</span> <span class="nv">$j</span> ~/mail/<span class="nv">$ACCOUNT</span>/trash/cur/<span class="nv">$FILE_NOUID</span>
        <span class="k">fi
    done
done</span>
</pre></td></tr></tbody></table></code></pre></figure>

<p>I had used simpler expansions in the past on other scripts, but the set that was
built out in lines 16 through 18 used regex to solve an issue that would be much
harder otherwise. Per the <a href="https://github.com/OfflineIMAP/offlineimap3/blob/master/offlineimap/folder/Maildir.py#L68">implementation</a> by offlineimap3, the maildir name is hashed using MD5 and appended to the filename of each piece of mail. During my testing, when I was moving files locally, and syncing the changes with the remote, I found duplicate mails and other inconsistencies. I realized after reviewing this piece of code that the mismatch of the hash to the changed folder was causing the issue. By removing the hash as part of the tidy operation, this ensured consistency between the local and remote mail repositories.</p>

<p>The entire script is in a <a href="https://gist.github.com/kriation/c269b10e9d1cd750968da29b143788ce">gist</a> for those that are interested and I’ll continue to update it if I encounter edge cases that need to be dealt with. I reused the trash loop to create an archive loop so that I can use a different notmuch tag (‘archive’) to handle moving mails from inbox to archive when in my unified inbox virtual folder.</p>

<p>I use three macros in my neomutt configuration for when I’m in a virtual folder.</p>

<figure class="highlight"><pre><code class="language-bash" data-lang="bash">macro index,pager <span class="se">\c</span>a <span class="s2">"&lt;modify-labels&gt;+archive</span><span class="se">\n</span><span class="s2">&lt;next-entry&gt;"</span> <span class="s2">"+archive"</span>
macro index,pager <span class="se">\c</span>d <span class="s2">"&lt;modify-labels&gt;+trash</span><span class="se">\n</span><span class="s2">&lt;next-entry&gt;"</span> <span class="s2">"+trash"</span>
macro index,pager <span class="se">\c</span>u <span class="s2">"&lt;modify-labels&gt;-trash</span><span class="se">\n</span><span class="s2">"</span> <span class="s2">"-trash"</span></code></pre></figure>

<p>I won’t comment on how many hours I spent researching and eventually building this solution; it was a lot. I learned a lot about IMAP, and in general, how my mail tools could be configured to work together. I give <strong>a lot</strong> of credit to each of the development teams that maintain the tools that give me the opportunity to manage my e-mail in a way that’s convenient for me.</p>]]></content><author><name>Armen Kaleshian</name><email>armen@kriation.com</email></author><category term="google" /><category term="google gsuite" /><category term="google-workspace" /><category term="imap" /><category term="offlineimap" /><category term="neomutt" /><category term="notmuch" /><category term="gmail" /><summary type="html"><![CDATA[More than five years ago, I decided that I wanted a terminal based e-mail management solution for the half a dozen e-mail addresses I read on any given day. My requirements were a unified inbox, tagging, and offline synchronization using imap. After testing a variety of solutions, I landed on a combination that satisfied my requirements, except for deleting e-mail from Gmail. Over the last two weeks, I finally found a solution that works reliably. In this post, I’ll describe my research, and how I designed a solution that met my needs.]]></summary></entry><entry><title type="html">AWS WorkMail to Google Workspace</title><link href="https://blog.kriation.com/2023/aws-workmail-to-google-workspace.html" rel="alternate" type="text/html" title="AWS WorkMail to Google Workspace" /><published>2023-01-19T00:00:00-05:00</published><updated>2023-01-19T00:00:00-05:00</updated><id>https://blog.kriation.com/2023/aws-workmail-to-google-workspace</id><content type="html" xml:base="https://blog.kriation.com/2023/aws-workmail-to-google-workspace.html"><![CDATA[<p>For the past five years, kaleshian.net had SMTP and IMAP hosted through AWS WorkMail. It worked well for me as an individual but I realized that the user experience, especially through the portal left a lot to be desired. In addition,I had to consider that the family domain was going to host more than one active user in the very near future (given that the boys are needing access to e-mail). In this post, I describe the windy path of migrating from WorkMail to Workspace.</p>

<p>As a daily Linux user, I spend as much time as I can interacting with communities, services, and systems through a terminal window. The only graphical UI that I use is a browser because <a href="https://wikipedia.org/wiki/Links_(web_browser)">Links</a> has a tough time rendering images<sup id="fnref:1" role="doc-noteref"><a href="#fn:1" class="footnote" rel="footnote">1</a></sup>. My daily setup for interacting with e-mail is through a combination of <a href="https://www.offlineimap.org/">OfflineIMAP</a>, <a href="https://neomutt.org/">NeoMutt</a>, [msmtp][<a href="https://marlam.de/msmtp/">5</a>, and <a href="https://notmuchmail.org/">notmuch</a>. By orchestrating the configuration of these tools, I’m able to effectively manage e-mail through a single interface, completely through the keyboard in a terminal window. The challenge of using WorkMail was that while it satisfied my requirement (as I rarely interacted with e-mail through their UI), my family members dreaded the experience (in comparison to the other large e-mail providers). This led me to find a solution that would satisfy my requirement along with their’s.</p>

<p>Well, Armen, why didn’t you just use O365 as a replacement? 
Because Microsoft is <a href="https://support.microsoft.com/office/changes-to-microsoft-365-email-features-and-storage-e888d746-61e5-49e3-9bd1-94b88e9be988">deprecating personalized e-mail addresses by November 30, 2023</a>.</p>

<p>It was actually my first choice and I was really disappointed when I read the announcement. I considered standing up an Azure Active Directory instance, and building out O365 against it but decided that it would be complete overkill for the family’s needs. I wanted to keep the management overhead as low as possible. In addition, if I ever wanted to apply family controls to the boys’ Microsoft accounts, I wouldn’t be able to as you cannot associate an e-mail created through AAD to a personal Microsoft account. At this point, setting up a Google Workspace was my last option.</p>

<p>Once the decision was made, setting up the Workspace was straight forward and updating the domain MX records were seamless. The concern I had was how to migrate 6K e-mails from one service to another by using my existing toolset.  The alternatives were to use Google’s <a href="https://support.google.com/a/topic/6245191">Data Migration Service</a> or keep the WorkMail account live for a period of time while Google imported e-mail over time via… <a href="https://wikipedia.org/wiki/Post_Office_Protocol">POP3</a>.</p>

<p>Enter OfflineIMAP.</p>

<p>By design, OfflineIMAP adheres to the <a href="https://www.rfc-editor.org/rfc/rfc3501">IMAP</a> standard which is enabled by default for both WorkMail and Workspace. My assumption would be that I could sync the contents of my WorkMail account locally one last time with OfflineIMAP after MX was updated and then use it again after a small configuration change to push the contents to my Workspace account. Without any customization, OfflineIMAP creates a <a href="https://wikipedia.org/wiki/Maildir">Maildir</a> structure for each account that’s configured during a synchronization using the exact name of the folders in the service. This presents a bit of an issue when your intent is to migrate contents from one directory structure to another.</p>

<p>When I first adopted my e-mail toolset, I spent a considerable time leveraging the <strong>nametrans</strong> and <strong>folderfilter</strong> options of OfflineIMAP to bring consistency when interacting with my e-mail (especially across accounts).</p>

<figure class="highlight"><pre><code class="language-conf" data-lang="conf">[<span class="n">Repository</span> <span class="n">kaleshian</span>@<span class="n">local</span>]
<span class="n">nametrans</span> = <span class="n">lambda</span> <span class="n">folder</span>:  <span class="n">re</span>.<span class="n">sub</span>(<span class="s1">'archive'</span>, <span class="s1">'[Gmail]/All Mail'</span>,
	<span class="n">re</span>.<span class="n">sub</span>(<span class="s1">'drafts'</span>, <span class="s1">'[Gmail]/Drafts'</span>,
	<span class="n">re</span>.<span class="n">sub</span>(<span class="s1">'flagged'</span>, <span class="s1">'[Gmail]/Starred'</span>,
	<span class="n">re</span>.<span class="n">sub</span>(<span class="s1">'trash'</span>, <span class="s1">'[Gmail]/Trash'</span>,
	<span class="n">re</span>.<span class="n">sub</span>(<span class="s1">'spam'</span>, <span class="s1">'[Gmail]/Spam'</span>,
	<span class="n">re</span>.<span class="n">sub</span>(<span class="s1">'inbox'</span>, <span class="s1">'INBOX'</span>, <span class="n">folder</span>))))))

[<span class="n">Repository</span> <span class="n">kaleshian</span>@<span class="n">remote</span>]
<span class="n">nametrans</span> = <span class="n">lambda</span> <span class="n">folder</span>:  <span class="n">re</span>.<span class="n">sub</span>(<span class="s1">'\[Gmail\]\/All Mail'</span>, <span class="s1">'archive'</span>,
	<span class="n">re</span>.<span class="n">sub</span>(<span class="s1">'\[Gmail\]\/Drafts'</span>, <span class="s1">'drafts'</span>,
	<span class="n">re</span>.<span class="n">sub</span>(<span class="s1">'\[Gmail\]\/Starred'</span>, <span class="s1">'flagged'</span>,
	<span class="n">re</span>.<span class="n">sub</span>(<span class="s1">'\[Gmail\]\/Trash'</span>, <span class="s1">'trash'</span>,
	<span class="n">re</span>.<span class="n">sub</span>(<span class="s1">'\[Gmail\]\/Spam'</span>, <span class="s1">'spam'</span>,
	<span class="n">re</span>.<span class="n">sub</span>(<span class="s1">'INBOX'</span>, <span class="s1">'inbox'</span>, <span class="n">folder</span>))))))

<span class="n">folderfilter</span> = <span class="n">lambda</span> <span class="n">folder</span>: <span class="n">folder</span> <span class="n">in</span> [<span class="s1">'[Gmail]/All Mail'</span>,
	<span class="s1">'[Gmail]/Drafts'</span>,
	<span class="s1">'[Gmail]/Starred'</span>,
	<span class="s1">'[Gmail]/Trash'</span>,
	<span class="s1">'[Gmail]/Spam'</span>,
	<span class="s1">'INBOX'</span>]</code></pre></figure>

<p>There are two blocks above for the account definition in my OfflineIMAP configuration. The first is for the local definition, and the second is for how the service will interact with the IMAP directory structure remotely.</p>

<p>In this case, the local nametrans (or name transformation) is exactly as defined in the remote block, except that it’s reversed. The intent of each definition is to take the remote server structure, and convert it to a user defined standard locally. For my case, I wanted the standard e-mail containers (e.g., inbox, drafts, flagged, trash, and spam) to all the look the same regardless of what account I was reviewing mail in.</p>

<p>The remote for WorkMail had a very different structure, but because I had ensured that locally, all of the accounts had matching directory structures, I was able to point the <strong>localfolder</strong> for the new remote target to the same directory structure, and let OfflineIMAP sync the contents to the Workspace account.</p>

<p>Overall, I was really pleased with the process and how well OfflineIMAP continues to work for my needs.</p>

<div class="footnotes" role="doc-endnotes">
  <ol>
    <li id="fn:1" role="doc-endnote">
      <p>This was a joke. <a href="#fnref:1" class="reversefootnote" role="doc-backlink">&#8617;</a></p>
    </li>
  </ol>
</div>]]></content><author><name>Armen Kaleshian</name><email>armen@kriation.com</email></author><category term="aws" /><category term="google" /><category term="aws-workmail" /><category term="google gsuite" /><category term="google-workspace" /><category term="imap" /><category term="offlineimap" /><category term="microsoft" /><category term="microsoft-o365" /><summary type="html"><![CDATA[For the past five years, kaleshian.net had SMTP and IMAP hosted through AWS WorkMail. It worked well for me as an individual but I realized that the user experience, especially through the portal left a lot to be desired. In addition,I had to consider that the family domain was going to host more than one active user in the very near future (given that the boys are needing access to e-mail). In this post, I describe the windy path of migrating from WorkMail to Workspace.]]></summary></entry><entry><title type="html">Availability Sets in Azure</title><link href="https://blog.kriation.com/2023/availability-sets-in-azure.html" rel="alternate" type="text/html" title="Availability Sets in Azure" /><published>2023-01-12T00:00:00-05:00</published><updated>2023-01-12T00:00:00-05:00</updated><id>https://blog.kriation.com/2023/availability-sets-in-azure</id><content type="html" xml:base="https://blog.kriation.com/2023/availability-sets-in-azure.html"><![CDATA[<p>As part of a resiliency effort with one of my customers, we invested time in developing an Availability Set deployment model for their VMs that would ensure that regardless of the deployment size, a given workload process would continue to function when the hypervisor responsible for the VM was in a fault state or being updated. The challenge we encountered was how to determine whether a given region supported two or three fault domains. In this blog post, I describe why knowing how many fault domains was necessary, and how I determined an authoritative record of the number per region.</p>

<p>An <a href="https://learn.microsoft.com/azure/virtual-machines/availability-set-overview">Availability Set</a> is a “<em>logical grouping of VMs that allows Azure to understand how your application is built to provide for redundancy and availability.</em>” When you create an AS in a given region, you’re effectively stating to Azure that the VMs inside of that grouping require orchestration as it relates to how they’re affected by a fault to the underlying compute, network, or storage (at the hypervisor level) or by an update to the hypervisor itself. When either of these events occur, it’s Azure’s responsibility based on the association of the VM to an Availability Set that determines how the VM is handled compared to its workload peer VMs. To handle each of these cases (faults and updates), Azure <a href="https://learn.microsoft.com//rest/api/compute/availability-sets/create-or-update?tabs=HTTP">provides</a> the ability to define how many fault and update domains an Availability Set can manage for a given region. A fault domain is a grouping of virtual machines that share a common power source and network switch. In addition, VMs are also aligned with disk fault domains which ensures that the managed disks associated to those VMs are located (effectively) on unique storage.</p>

<p>It’s this association that determines whether a given region can have an availability set with two or three fault domains when it’s instantiated.</p>

<p>As a <a href="https://en.wikipedia.org/wiki/Bash_(Unix_shell)">Bash</a> shell enthusiast, I figured I could whip up a script to dynamically generate the list by brute forcing the creation of an availability set against every region that my Azure account has access to with the fault domain variable set to 3, and so I did.</p>

<figure class="highlight"><pre><code class="language-bash" data-lang="bash"><table class="rouge-table"><tbody><tr><td class="gutter gl"><pre class="lineno">1
2
3
4
5
6
7
8
9
</pre></td><td class="code"><pre><span class="k">for </span>i <span class="k">in</span> <span class="si">$(</span>az account list-locations <span class="nt">-o</span> tsv <span class="nt">--query</span> <span class="o">[]</span>.name<span class="si">)</span><span class="p">;</span> <span class="k">do 
if </span>az group create <span class="nt">-o</span> none <span class="nt">-l</span> <span class="nv">$i</span> <span class="nt">-n</span> rg-as-<span class="nv">$i</span> 2&gt; /dev/null<span class="p">;</span> 
<span class="k">then 
if </span>az vm availability-set create <span class="nt">-o</span> none <span class="nt">-n</span> as-<span class="nv">$i</span> <span class="nt">-g</span> rg-as-<span class="nv">$i</span> <span class="nt">-l</span> <span class="nv">$i</span> <span class="nt">--platform-fault-domain-count</span> 3 <span class="nt">--platform-update-domain-count</span> 3 2&gt;/dev/null<span class="p">;</span> 
<span class="k">then </span><span class="nb">echo</span> <span class="s2">"</span><span class="nv">$i</span><span class="s2">,supported"</span><span class="p">;</span> 
<span class="k">else </span><span class="nb">echo</span> <span class="s2">"</span><span class="nv">$i</span><span class="s2">,unsupported"</span><span class="p">;</span> 
<span class="k">fi</span><span class="p">;</span>
<span class="k">done</span><span class="p">;</span>
</pre></td></tr></tbody></table></code></pre></figure>

<p>The script is relatively straight forward. Assuming that az cli is configured correctly, the loop starts with listing all of the regions that the account has access to, and then for each one, creates a resource group, and if successful, attemps to create an availability set in that region with the fault domain variable set to 3. If successful, it prints the region and that it’s supported. If not, unsupported.</p>

<p>At this time, only 16 regions supported three fault domains. They are:</p>
<ul>
  <li>eastus</li>
  <li>eastus2</li>
  <li>southcentralus</li>
  <li>westus2</li>
  <li>westus3</li>
  <li>northeurope</li>
  <li>swedencentral</li>
  <li>westeurope</li>
  <li>centralus</li>
  <li>centralindia</li>
  <li>japaneast</li>
  <li>canadacentral</li>
  <li>francecentral</li>
  <li>brazilsouth</li>
  <li>northcentralus</li>
  <li>westus</li>
</ul>

<p>I’m curious how this list will change over time. I’m glad that my customer had this requirement because it provided an opportunity for me to learn more about Availability Sets and how their implementation can vary between regions.</p>]]></content><author><name>Armen Kaleshian</name><email>armen@kriation.com</email></author><category term="azure" /><category term="azure-availability-set" /><category term="resiliency" /><summary type="html"><![CDATA[As part of a resiliency effort with one of my customers, we invested time in developing an Availability Set deployment model for their VMs that would ensure that regardless of the deployment size, a given workload process would continue to function when the hypervisor responsible for the VM was in a fault state or being updated. The challenge we encountered was how to determine whether a given region supported two or three fault domains. In this blog post, I describe why knowing how many fault domains was necessary, and how I determined an authoritative record of the number per region.]]></summary></entry><entry><title type="html">DoH on a RPi</title><link href="https://blog.kriation.com/2022/doh-on-a-rpi.html" rel="alternate" type="text/html" title="DoH on a RPi" /><published>2022-12-22T00:00:00-05:00</published><updated>2022-12-22T00:00:00-05:00</updated><id>https://blog.kriation.com/2022/doh-on-a-rpi</id><content type="html" xml:base="https://blog.kriation.com/2022/doh-on-a-rpi.html"><![CDATA[<p>A couple of months ago, friends and I were discussing the benefits of running <a href="https://pi-hole.net/">pi.hole</a> on our home networks to curb the volume of unwanted advertisements while browsing the web. In addition, given that we all have kids, we started to solution methods to control non-family friendly content. During this discussion, I started thinking about the plaintext nature of DNS and how to mitigate exposure of the queries leaving our network to the upstream provider. Enter DNS over TLS and DNS over HTTP.</p>

<p><a href="https://wikipedia.org/wiki/DNS_over_TLS">DNS over TLS</a> was introduced as part of <a href="https://www.rfc-editor.org/rfc/rfc7858">RFC 7858</a> in 2016</p>

<p><a href="https://wikipedia.org/wiki/DNS_over_HTTPS">DNS over HTTP</a> was introduced as part of <a href="https://www.rfc-editor.org/rfc/rfc8484">RFC 8484</a> in 2018.</p>

<p>Both of these specifications were designed for the purpose of “mitigat[ing] both passive surveillance <a href="https://www.rfc-editor.org/rfc/rfc7258">RFC 7258</a> and active attacks that attempt to divert DNS traffic to rogue servers (see Section 2.5.1 of <a href="https://www.rfc-editor.org/rfc/rfc7626#section-2.5.1">RFC 7626</a>).” While their implementations are slightly different, the method of their mitigation is similar. Cloudflare has an <a href="https://www.cloudflare.com/learning/dns/dns-over-tls/">overview</a> of the two implementations in their learning center that is worth a read if you’re interested in the technical detail.</p>

<p>At a high level, an upstream resolver listening for DNS queries over TLS is simply communicating with the caller using the standard name resolution protocol but wrapped by a negotiated TLS connection encrypting the content of the query and the response. DNS over HTTP sends a DNS query using the standard HTTP format and the response is delivered as contents with a corresponding content type. This method provides the added protection of blending in with standard web queries as the traffic is delivered over the same ports. The challenge with incorporating DoH versus DoT is that it requires a proxy to forward standard DNS queries from the trusted network to the upstream resolver.</p>

<p>If I chose the easy route to implement DoT, I would be able to configure resolved (part of systemd)<a href="https://www.freedesktop.org/software/systemd/man/systemd-resolved.service.html">9</a> to forward queries over DoT through the addition of a single key value pair configuration setting <em><a href="https://www.freedesktop.org/software/systemd/man/resolved.conf.html#DNSOverTLS=">DNSOverTLS</a></em>. As long as the upstream resolver supports DoT, then this value can be set to true (it takes a Boolean, or the value <em>opportunistic</em>).  With resolved configured properly, and running on the RPi, the final step is to configure the upstream DNS server to point to the local resolved listener. In the screenshot below, I configured pihole to use the DoH proxy which is listening on port 5053.</p>

<figure class="figure  figure-frame">
    <img class="figure_image" src="/assets/posts/2022/rpi-dns.png" />
    
</figure>

<p>Given that my requirement was to implement DoH for my local network, I set out to find a DoH proxy that I could <em>easily</em> implement on the RPi. I had considered configuring <a href="https://wikipedia.org/wiki/Unbound_(DNS_server)">Unbound</a> a number of times over the years, but the overhead never seemed worth it. Installing and configuring BIND also seemed like overkill especially considering pihole was using Dnsmasq under the covers. I decided to re-read the pihole documentation to see if the community had shared any other alternatives.</p>

<p>In the official documentation, under the guides section, I discovered <a href="https://docs.pi-hole.net/guides/dns/cloudflared/">cloudflared</a>. Apparently, the amazing folks at cloudflare wrote an <a href="https://github.com/cloudflare/cloudflared">open source’d tunnel client</a> to support their customers connecting to their resources over a private connection. A small feature of this client is to listen for standard DNS requests, and proxy them to a DoH resolver. 🎆</p>

<p>I followed the <a href="https://docs.pi-hole.net/guides/dns/cloudflared/">documentation</a> provided by the pihole folks to the last period and in a few minutes, I completed my requirement of sending DNS queries completely encrypted to my resolver of choice. pihole continues to perform as exactly as designed. I discovered from digging through the cloudflared repository that the daemon has a metrics endpoint which I may investigate in the future.</p>

<p>Thanks to the folks at pihole and at cloudflare for contributing to the community!</p>]]></content><author><name>Armen Kaleshian</name><email>armen@kriation.com</email></author><category term="dns" /><category term="doh" /><category term="rpi" /><category term="home network" /><summary type="html"><![CDATA[A couple of months ago, friends and I were discussing the benefits of running pi.hole on our home networks to curb the volume of unwanted advertisements while browsing the web. In addition, given that we all have kids, we started to solution methods to control non-family friendly content. During this discussion, I started thinking about the plaintext nature of DNS and how to mitigate exposure of the queries leaving our network to the upstream provider. Enter DNS over TLS and DNS over HTTP.]]></summary></entry><entry><title type="html">Handling case-sensitive tags in Azure Policy</title><link href="https://blog.kriation.com/2021/handling-case-sensitive-tags-in-azure-policy.html" rel="alternate" type="text/html" title="Handling case-sensitive tags in Azure Policy" /><published>2021-11-23T17:00:00-05:00</published><updated>2021-11-23T17:00:00-05:00</updated><id>https://blog.kriation.com/2021/handling-case-sensitive-tags-in-azure-policy</id><content type="html" xml:base="https://blog.kriation.com/2021/handling-case-sensitive-tags-in-azure-policy.html"><![CDATA[<p>A few weeks ago, I was working with one of my customers in refining their public cloud governance model, in particular as it related to tag enforcement. While they had a mature resource deployment process that ensured the proper application of tags, they struggled with a single tag that could be set to alphanumeric values with assorted cases. There system of record for these values was ancient and despite my pleading to augment the data with a lower() or upper(), they asked me to come up with a solution.</p>

<p>With the requirement from the customer that I would not be able to augment their dataset, I had to find a way to perform an exact comparison of a value set for a tag against the dataset.</p>

<p>For a problem like this, I start by reviewing the publicy available documentation and this case was no exception. The Azure Policy definition <a href="https://learn.microsoft.com/en-us/azure/governance/policy/concepts/definition-structure#policy-functions">documentation</a> was comprehensive and specifically stated that outside of a dozen functions, all of the Azure Resource Manager template functions could be used within a policy definition. The <a href="https://learn.microsoft.com/en-us/azure/azure-resource-manager/templates/template-functions">template functions</a> were nicely grouped by category and I reviewed them to see if there was one that would provide the comparison I needed. There were only two that raised my interest, <a href="https://learn.microsoft.com/en-us/azure/azure-resource-manager/templates/template-functions-string#contains">contains</a> and <a href="https://learn.microsoft.com/en-us/azure/azure-resource-manager/templates/template-functions-string#startsWith">startsWith</a>, both of which had inherant flaws in their implementation for what I needed them to do. contains was case-sensitive when comparing strings, but because of its lack of precision (by design), it could produce false positives (or negatives) during tag evaluation. startsWith had a similar flaw but was also case-insensitive. At first glance, none of the functions listed in the strings section would satisfy my requirement.</p>

<p>I spent time thinking about the problem over the next two days comparing this problem to ones I solved in the past. Years ago, when I was at RSA, spending time designing and implementing PKI for customers, I quickly learned the two most common formats for an X.509 certificate; DER, which was binary encoded ASN.1 and PEM, which was significantly more human readable. I lost count of how many times I sent a DER encoded certificate to output on the terminal and its bell ringing incessantly until it reached the end of the file. It was during this time that I learned the power of base64 encoding.</p>

<p>For those unfamiliar, “<em>base64 is a group of binary-to-text encoding schemes that represent binary data (more specifically, a sequence of 8-bit bytes) in sequences of 24 bits that can be represented by four 6-bit Base64 digits</em>”<sup id="fnref:1" role="doc-noteref"><a href="#fn:1" class="footnote" rel="footnote">1</a></sup>. In layman’s terms, providing a means to encode binary data in a human readable form. While our requirement for this use case is to compare string data, the nuance of character case needs to be maintained. In reviewing the the <a href="https://www.rfc-editor.org/rfc/rfc4648#section-4">base64 alphabet</a>, we observe that case can be preserved.</p>

<p>We can easily create a policy that would determine a precise match for a tag. Using the policy provided in the Microsoft <a href="https://github.com/Azure/azure-policy/blob/master/built-in-policies/policyDefinitions/Tags/ResourceGroupRequireTagAndValue_Deny.json">example</a> as reference, one could perform a comparison against a set of tags in the policy definition parameters using the base64 function.</p>

<figure class="highlight"><pre><code class="language-json" data-lang="json"><table class="rouge-table"><tbody><tr><td class="gutter gl"><pre class="lineno">1
2
3
4
5
6
7
8
9
10
11
12
</pre></td><td class="code"><pre><span class="w">      </span><span class="nl">"if"</span><span class="p">:</span><span class="w"> </span><span class="p">{</span><span class="w">
        </span><span class="nl">"allOf"</span><span class="p">:</span><span class="w"> </span><span class="p">[</span><span class="w">
          </span><span class="p">{</span><span class="w">
            </span><span class="nl">"field"</span><span class="p">:</span><span class="w"> </span><span class="s2">"type"</span><span class="p">,</span><span class="w">
            </span><span class="nl">"equals"</span><span class="p">:</span><span class="w"> </span><span class="s2">"Microsoft.Resources/subscriptions/resourceGroups"</span><span class="w">
          </span><span class="p">},</span><span class="w">
          </span><span class="p">{</span><span class="w">
            </span><span class="nl">"field"</span><span class="p">:</span><span class="w"> </span><span class="s2">"[concat('tags[', parameters('tagName'), ']')]"</span><span class="p">,</span><span class="w">
            </span><span class="nl">"notEquals"</span><span class="p">:</span><span class="w"> </span><span class="s2">"[base64(parameters('tagValue'))]"</span><span class="w">
          </span><span class="p">}</span><span class="w">
        </span><span class="p">]</span><span class="w">
      </span><span class="p">}</span><span class="err">,</span>
</pre></td></tr></tbody></table></code></pre></figure>

<p>Once the function was discovered, and we tested it successfully, we were quite pleased at how well it worked. The lesson learned here is that experiences from the past can be leveraged to solve problems in the present.</p>

<div class="footnotes" role="doc-endnotes">
  <ol>
    <li id="fn:1" role="doc-endnote">
      <p>https://en.wikipedia.org/wiki/Base64 <a href="#fnref:1" class="reversefootnote" role="doc-backlink">&#8617;</a></p>
    </li>
  </ol>
</div>]]></content><author><name>Armen Kaleshian</name><email>armen@kriation.com</email></author><category term="azure policy" /><summary type="html"><![CDATA[A few weeks ago, I was working with one of my customers in refining their public cloud governance model, in particular as it related to tag enforcement. While they had a mature resource deployment process that ensured the proper application of tags, they struggled with a single tag that could be set to alphanumeric values with assorted cases. There system of record for these values was ancient and despite my pleading to augment the data with a lower() or upper(), they asked me to come up with a solution.]]></summary></entry><entry><title type="html">Azure Logs to a SIEM</title><link href="https://blog.kriation.com/2021/azure-logs-to-a-siem.html" rel="alternate" type="text/html" title="Azure Logs to a SIEM" /><published>2021-10-14T23:00:00-04:00</published><updated>2021-10-14T23:00:00-04:00</updated><id>https://blog.kriation.com/2021/azure-logs-to-a-siem</id><content type="html" xml:base="https://blog.kriation.com/2021/azure-logs-to-a-siem.html"><![CDATA[<p>Recently, I worked with a customer that wanted to wrangle their Azure log data
to meet their audit requirements. Their Security Operations Center (<abbr title="Security Operations Center">SOC</abbr>) was
mature and had an established Security Incident and Event Management (<abbr title="Security Incident and Event Management">SIEM</abbr>)
process. To achieve compliance, they requested that only security event data
from Azure be streamed to their <abbr title="Security Incident and Event Management">SIEM</abbr> solution. In this post, I describe the
process to identify, filter, and stream the log data out of Azure.</p>

<p><a href="https://docs.microsoft.com/azure/azure-monitor">Azure Monitor</a> is “<em>a comprehensive solution for collecting, analyzing, and
acting on telemetry</em>”<sup id="fnref:1" role="doc-noteref"><a href="#fn:1" class="footnote" rel="footnote">1</a></sup> from within Azure (and on-premise environments). By
default, the solution provides you access to the platform <a href="https://docs.microsoft.com/azure/azure-monitor/essentials/activity-log">activity log</a>
which provides insight into the activity against an Azure subscription. However,
the data is only retained for <a href="https://docs.microsoft.com/azure/azure-monitor/essentials/activity-log#retention-period">90 days</a> which does not adhere to most
enterprise data retention standards.</p>

<p>Enter <a href="https://docs.microsoft.com/azure/azure-monitor/logs/log-analytics-overview">Log Analytics Workspaces</a> (<abbr title="Log Analytics Workspace">LAW</abbr>).</p>

<p>At a high level, <abbr title="Log Analytics Workspace">LAW</abbr> “<em>is an Azure resource and a container where [log] data is collected, aggregated, and serves as an
administrative boundary.</em>”<sup id="fnref:2" role="doc-noteref"><a href="#fn:2" class="footnote" rel="footnote">2</a></sup> for analysis of the data. Log retention is typically the first checkbox that’s marked as
part of an audit requirement whether an organization has workloads on-premise or in the public cloud. The challenge is
how to make the logs you have actionable. One of the immediate benefits of directing logs to <abbr title="Log Analytics Workspace">LAW</abbr> is that it’s query
engine is built on top of <a href="https://docs.microsoft.com/azure/azure-monitor/logs/log-analytics-overview#relationship-to-azure-data-explorer">Azure Data Explorer</a> which is powered by the <a href="https://docs.microsoft.com/azure/data-explorer/kusto/query/">Kusto Query Language</a> (<abbr title="Kusto Query Language">KQL</abbr>). In comparison to
other query languages (e.g., SQL, GraphQL), Kusto uses a similar syntax pattern that has a low barrier to entry. For
example, once you create a workspace and start sending log data to it (after a brief delay for log ingestion), you’ll have
a list of tables in the left pane of your workspace as shown below.</p>

<figure class="figure  figure-frame">
    <img class="figure_image" src="/assets/posts/2021/tables.png" />
    
</figure>

<p>Once the tables are visible, stitching together a useful query is straight forward. You can double-click on the table name
or start typing it in the query window.</p>

<figure class="figure  figure-frame">
    <img class="figure_image" src="/assets/posts/2021/count.png" />
    
</figure>

<p>The above short query counts the number of rows in the AzureActivity with a timestamp less than or equal to 24 hours (as defined
by the time range selector at the top of the query box). The extent and expanse of <abbr title="Kusto Query Language">KQL</abbr> is immense. If you’re interested, I <strong>highly</strong>
recommend reviewing the <abbr title="Kusto Query Language">KQL</abbr> documentation in depth and practicing each of the skills listed in it.</p>

<p>My customer’s requirement was to only send security event data from Azure to their <abbr title="Security Incident and Event Management">SIEM</abbr>.</p>

<p>Right. With <abbr title="Kusto Query Language">KQL</abbr>, this was easy.</p>

<p>After setting up a couple of Windows VMs in my lab environment and configuring them with the <a href="https://docs.microsoft.com/azure/azure-monitor/agents/data-sources-windows-events">Log Analytics Agent</a>, I observed
a new table in my <abbr title="Log Analytics Workspace">LAW</abbr> named <strong>Event</strong> and was able to filter on it with <a href="https://docs.microsoft.com/azure/azure-monitor/agents/data-sources-windows-events#log-queries-with-windows-events">examples</a> from the Azure documentation. In addition,
I configured Azure Sentinel to receive Security Event data from the instructions in the <a href="https://docs.microsoft.com//azure/sentinel/connect-windows-security-events?tabs=LAA">documentation</a>. Once these events were
ingested, I observed the SecurityEvent table in the list of <abbr title="Log Analytics Workspace">LAW</abbr> tables. At this point, I knew I had the data I needed.</p>

<p>The next step of the solution was to build automation to poll the <abbr title="Log Analytics Workspace">LAW</abbr> with a predefined query to gather only the required events,
and send them to Event Hub (where they would be polled by the <abbr title="Security Incident and Event Management">SIEM</abbr>).</p>

<p>Enter <a href="https://docs.microsoft.com/azure/logic-apps/logic-apps-overview">Logic Apps</a>.</p>

<p>Logic Apps “<em>is a cloud-based platform for creating and running automated workflows that integrate[s] apps, data, services,
and systems.</em>” Effectively, a low-code automation solution to perform exactly what my customer needs. I scanned the <a href="https://docs.microsoft.com/azure/connectors/built-in">built-in</a>
connectors and found one called <em>Schedule</em> that had a trigger called <em><a href="https://docs.microsoft.com/azure/connectors/connectors-native-recurrence">Recurrence</a></em>.</p>

<p>Awesome. I had my polling mechanism. I created a logic app, and added the trigger.</p>

<figure class="figure  figure-frame">
    <img class="figure_image" src="/assets/posts/2021/recurrence.png" />
    
</figure>

<p>The next step was to pull data from my <abbr title="Log Analytics Workspace">LAW</abbr>… was there a connector for Azure Monitor?</p>

<p><a href="https://docs.microsoft.com/azure/azure-monitor/logs/logicapp-flow-connector">Yes</a>!</p>

<p>I added the connector, selected the <em>Run query and list results</em> trigger…</p>

<figure class="figure  figure-frame">
    <img class="figure_image" src="/assets/posts/2021/connector-overview.png" />
    
</figure>

<p>… and configured it using the query I had honed within my <abbr title="Log Analytics Workspace">LAW</abbr>.</p>

<figure class="figure  figure-frame">
    <img class="figure_image" src="/assets/posts/2021/connector-config.png" />
    
</figure>

<p>The only nuance was that the time window of the query had to match (or exceed) the interval frequency of the recurrence trigger to ensure
that events wouldn’t be missed.</p>

<p>The next few steps required a bit of analysis (read: trial and error). The reason for the churn was because I didn’t quite understand
how the records would be fed to my Logic App from the connector. I had assumed that it would be returned as a single blob that needed
to be iterated on. I discovered that each row from the query required parsing and had to accommodate that step in my workflow. I discovered
the <a href="https://docs.microsoft.com/azure/logic-apps/logic-apps-control-flow-loops#foreach-loop">For each</a> action and configured it to take the <em>value</em> from the previous step and pass it to a step that would parse the JSON string.</p>

<figure class="figure  figure-frame">
    <img class="figure_image" src="/assets/posts/2021/foreach-config.png" />
    
</figure>

<p>Configuring the Parse JSON action was… painful. For Parse JSON to be able to understand the incoming JSON object, it effectively needs to know
the object structure, the keys, and what types the values will be (e.g., integer, string, etc.) The easy way is to follow the instruction in the
action box and to “Use sample schema to generate schema” but we all know that a single example isn’t going to be comprehensive of the data.</p>

<p>I <strong>had</strong> to find another way.</p>

<p>I tried to export the schema of the source table from the <abbr title="Log Analytics Workspace">LAW</abbr>, but it didn’t produce an output that could be automated.
I tried using the az cli, piping the output through <a href="https://stedolan.github.io/jq/">jq</a>, but that didn’t produce an output that could be directly transferred to the action.
I was stuck, and frustrated, but was running out of time, so I conceded and massaged the most reasonable output from the above three options by hand,
and produced the following two schemas:</p>
<ul>
  <li><a href="/assets/posts/2021-10-14-azure-logs-to-a-siem/event.json">event.json</a></li>
  <li><a href="/assets/posts/2021-10-14-azure-logs-to-a-siem/securityevent.json">securityevent.json</a></li>
</ul>

<p>At the publication time of this post, these two schemas were valid. I was able to create two separate logic apps with these two schemas, and appropriate
adjustments to the log query (to respect the table of data that the schema was applicable to).</p>

<p>Once the Parse JSON action was configured, I discovered that I needed an additional step to aggregate the events into a single object before passing it
to Event Hub. This action was the responsibility of the <a href="https://docs.microsoft.com/azure/logic-apps/logic-apps-perform-data-operations#compose-action">Compose</a> action which only required a single argument of <em>Body</em> from the previous For Each.</p>

<figure class="figure  figure-frame">
    <img class="figure_image" src="/assets/posts/2021/compose-config.png" />
    
</figure>

<p>The last step was to send the completed message to Event Hub which required the <em>Send event</em> action in the Event Hubs category of connectors.</p>

<figure class="figure  figure-frame">
    <img class="figure_image" src="/assets/posts/2021/eventhub-config.png" />
    
</figure>

<p>With the last step of the workflow configured, I was able to save the design and execute the workflow successfully. Through this process, I interacted
with components of Azure that I would never expect (and was pleasantly surprised to). It reinforced my perspective that without a use case, it’s
quite difficult to learn about how public cloud services can be configured (read: cobbled together) to achieve a desired outcome.</p>

<p>Happy solutioning!</p>

<div class="footnotes" role="doc-endnotes">
  <ol>
    <li id="fn:1" role="doc-endnote">
      <p>https://docs.microsoft.com/en-us/azure/azure-monitor/overview <a href="#fnref:1" class="reversefootnote" role="doc-backlink">&#8617;</a></p>
    </li>
    <li id="fn:2" role="doc-endnote">
      <p>https://docs.microsoft.com/azure/azure-monitor/logs/design-logs-deployment <a href="#fnref:2" class="reversefootnote" role="doc-backlink">&#8617;</a></p>
    </li>
  </ol>
</div>]]></content><author><name>Armen Kaleshian</name><email>armen@kriation.com</email></author><category term="azure" /><category term="azure event hubs" /><category term="kusto" /><category term="azure log analytics workspace" /><category term="azure logic app" /><category term="operational excellence" /><category term="cost optimization" /><summary type="html"><![CDATA[Recently, I worked with a customer that wanted to wrangle their Azure log data to meet their audit requirements. Their Security Operations Center (SOC) was mature and had an established Security Incident and Event Management (SIEM) process. To achieve compliance, they requested that only security event data from Azure be streamed to their SIEM solution. In this post, I describe the process to identify, filter, and stream the log data out of Azure.]]></summary></entry><entry><title type="html">CodeBuild cache for Jekyll build</title><link href="https://blog.kriation.com/2021/codebuild-cache-for-jekyll-build.html" rel="alternate" type="text/html" title="CodeBuild cache for Jekyll build" /><published>2021-07-01T23:54:00-04:00</published><updated>2021-07-01T23:54:00-04:00</updated><id>https://blog.kriation.com/2021/codebuild-cache-for-jekyll-build</id><content type="html" xml:base="https://blog.kriation.com/2021/codebuild-cache-for-jekyll-build.html"><![CDATA[<p>For the past couple of years, this blog is run from AWS with iterative
improvements to make publishing easier for me. Using a static site framework
like <a href="https://jekyllrb.com">Jekyll</a> minimized the need for a “Linux Apache MySQL PHP” (<abbr title="Linux Apache MySQL PHP">LAMP</abbr>) stack which used to be the
de-facto standard. The problem is that because of the amount of content, the
build times to publish were steadily increasing. In this post, I’ll describe
the <em>relatively</em> easy fix that resulted in a 70% improvement.</p>

<p><a href="https://jekyllrb.com">Jekyll</a> is an awesome, content management system that requires very little
infrastructure. The entire project with extras takes up less than 150MB on disk.
My workflow is to develop and test new content on my workstation and checking
changes with git when appropriate. Once I’m ready to publish, I push my local
repository changes upstream to a CodeCommit repository which kicks off a
CodeBuild project. (For more information on how this is configured, check out
the post <a href="/2019/magic-with-cloudwatch-codebuild.html">Magic of CloudWatch Events and CodeBuild</a>) When I first started, the
complete build and publication to S3 was taking on average 90 seconds which was
great. Since then, due to the addition of a couple of extra Jekyll plugins, the
time now averages 225 seconds. That’s a 250% increase! I knew that I had to
wrangle this issue before it became worse.</p>

<p>The first step in any performance evaluation is to benchmark each step.
Thankfully, CodeBuild tracks the start, and end times for each step of the build
so I didn’t have to look far. Once I looked at the data, it was pretty obvious
where the problem was.</p>

<table>
  <thead>
    <tr>
      <th style="text-align: left">Build Phase</th>
      <th style="text-align: center">Duration (seconds)</th>
    </tr>
  </thead>
  <tbody>
    <tr>
      <td style="text-align: left">Submitted</td>
      <td style="text-align: center">0</td>
    </tr>
    <tr>
      <td style="text-align: left">Queued</td>
      <td style="text-align: center">1</td>
    </tr>
    <tr>
      <td style="text-align: left">Provisioning</td>
      <td style="text-align: center">24</td>
    </tr>
    <tr>
      <td style="text-align: left">Download Source</td>
      <td style="text-align: center">4</td>
    </tr>
    <tr>
      <td style="text-align: left">Install</td>
      <td style="text-align: center">13</td>
    </tr>
    <tr>
      <td style="text-align: left">Pre Build</td>
      <td style="text-align: center">4</td>
    </tr>
    <tr>
      <td style="text-align: left">Build</td>
      <td style="text-align: center">163</td>
    </tr>
    <tr>
      <td style="text-align: left">Post Build</td>
      <td style="text-align: center">6</td>
    </tr>
    <tr>
      <td style="text-align: left">Upload Artifacts</td>
      <td style="text-align: center">5</td>
    </tr>
    <tr>
      <td style="text-align: left">Finalizing</td>
      <td style="text-align: center">2</td>
    </tr>
  </tbody>
</table>

<p>It was time to dig into the build phase of the project to understand why it was
taking so long. Enter the CloudWatch Log integration with CodeBuild. For each
build in a project, CodeBuild creates (if configured properly) a specific log
stream for each build. The contents of the log stream includes any stdout/stderr
output during every build phase. As soon as I reviewed the log stream for the
last build, I knew why the build phase was taking so long.</p>

<p>In my buildspec.yaml for the project, because I’m using the default AWS
container for the build, I am required to install my runtime (in this case
ruby), and its respective dependencies. This process also includes bundler, all of the Jekyll
gems, and their dependents. Have you figured it out yet? For each build, the
container was having to reach out to the Internet, pull all of the gems, and
install them before it could even start processing my treasured blog posts. If I
could find a way to cache them, I could improve the build time considerably!</p>

<p>Enter <a href="https://docs.aws.amazon.com/codebuild/latest/userguide/build-caching.html">CodeBuild’s Cache</a> functionality.</p>

<p>There are two options: local caching, and S3
Local caching wasn’t viable for me as the builds are too infrequent for it to
make sense, so I went down the path of using a specific S3 bucket for this
cache.</p>

<p>Since I use CloudFormation to manage all of my resources, I updated the template
with a couple of changes. The first was to add the S3 bucket:</p>

<figure class="highlight"><pre><code class="language-yaml" data-lang="yaml"><span class="na">CodeBuildCacheS3</span><span class="pi">:</span>
  <span class="na">Type</span><span class="pi">:</span> <span class="s">AWS::S3::Bucket</span>
  <span class="na">Properties</span><span class="pi">:</span>
    <span class="na">BucketName</span><span class="pi">:</span>
      <span class="kt">!Sub</span> <span class="s1">'</span><span class="s">${AWS::AccountId}-codebuild-cache'</span></code></pre></figure>

<p>Next was to add the appropriate permissions to get and put objects into the
bucket by the role assumed by CodeBuild during execution:</p>

<figure class="highlight"><pre><code class="language-yaml" data-lang="yaml"><span class="na">Effect</span><span class="pi">:</span> <span class="s">Allow</span>
<span class="na">Action</span><span class="pi">:</span>
  <span class="pi">-</span> <span class="s">s3:PutObject</span>
  <span class="pi">-</span> <span class="s">s3:GetObject</span>
<span class="na">Resource</span><span class="pi">:</span> <span class="kt">!Sub</span>
  <span class="pi">-</span> <span class="s1">'</span><span class="s">${CodeBuildCacheS3Arn}/*'</span>
  <span class="pi">-</span> <span class="pi">{</span> <span class="nv">CodeBuildCacheS3Arn</span><span class="pi">:</span> <span class="kt">!GetAtt</span> <span class="nv">CodeBuildCacheS3.Arn</span> <span class="pi">}</span></code></pre></figure>

<p>The last piece was adding the relevant cache block to the CodeBuild project:</p>

<figure class="highlight"><pre><code class="language-yaml" data-lang="yaml"><span class="na">Cache</span><span class="pi">:</span>
  <span class="na">Type</span><span class="pi">:</span> <span class="s">S3</span>
  <span class="na">Location</span><span class="pi">:</span> <span class="kt">!Ref</span> <span class="s">CodeBuildCacheS3</span></code></pre></figure>

<p>Once I updated the stack, I was eager to re-run the same build to observe the
changes by adding the cache…</p>

<p>I did, and didn’t notice any difference at all. I went back to look at the logs
and found an entry that indicated a cache miss.</p>

<figure class="highlight"><pre><code class="language-shell" data-lang="shell"><span class="o">[</span>Container] Unable to download cache: NoSuchKey: The specified key does not exist.</code></pre></figure>

<p>I continued reading through and discovered the following entries in the post
build phase:</p>

<figure class="highlight"><pre><code class="language-shell" data-lang="shell"><span class="o">[</span>Container] Entering phase POST_BUILD
<span class="o">[</span>Container] Uploading S3 cache...
<span class="o">[</span>Container] Phase <span class="nb">complete</span>: POST_BUILD State: SUCCEEDED</code></pre></figure>

<p>Awesome! A process within the post build phase was able to upload the contents I
had specified to be cached to S3. The file had a unique name using the standard
format for <a href="https://en.wikipedia.org/wiki/Universally_unique_identifier#Standards">Universally Unique Identifiers</a> (<abbr title="Universally Unique Identifier">UUID</abbr>). After downloading the file
to my local machine, I observed that it was a simple unencrypted tarball.</p>

<p>After unpacking it, I discovered a flat structure (no directories) containing
files with numbers for names and a file labeled codebuild.json.</p>

<p>codebuild.json is a properly formatted JSON object with the following header:</p>

<figure class="highlight"><pre><code class="language-json" data-lang="json"><span class="p">{</span><span class="nl">"version"</span><span class="p">:</span><span class="s2">"1.0"</span><span class="p">,</span><span class="nl">"content"</span><span class="p">:{</span><span class="nl">"files"</span><span class="p">:[</span></code></pre></figure>

<p>The header is then followed by JSON objects indicating the path of the file with
its proper name. Based on my interpretation and comparison, each JSON object
maps to the file in the package starting from the first file number in the
package.</p>

<p>Once the cache was populated, each subsequent build and publish was averaging 60
seconds. I was really pleased with how easily I was able to optimize this build
process. While this build is small, the impact caching has on large scale builds
is significant. For those of you that are using CodeBuild, and are struggling
with long build times, I highly recommend looking into using the cache option.</p>]]></content><author><name>Armen Kaleshian</name><email>armen@kriation.com</email></author><category term="aws" /><category term="aws codebuild" /><category term="jekyll" /><category term="aws cloudformation" /><category term="operational excellence" /><category term="performance" /><category term="cost optimization" /><summary type="html"><![CDATA[For the past couple of years, this blog is run from AWS with iterative improvements to make publishing easier for me. Using a static site framework like Jekyll minimized the need for a “Linux Apache MySQL PHP” (LAMP) stack which used to be the de-facto standard. The problem is that because of the amount of content, the build times to publish were steadily increasing. In this post, I’ll describe the relatively easy fix that resulted in a 70% improvement.]]></summary></entry><entry><title type="html">Azure Solutions Architect Expert</title><link href="https://blog.kriation.com/2021/azure-solutions-architect-expert.html" rel="alternate" type="text/html" title="Azure Solutions Architect Expert" /><published>2021-06-28T23:24:00-04:00</published><updated>2021-06-28T23:24:00-04:00</updated><id>https://blog.kriation.com/2021/azure-solutions-architect-expert</id><content type="html" xml:base="https://blog.kriation.com/2021/azure-solutions-architect-expert.html"><![CDATA[<p>When I joined Microsoft in August of ‘20, the only experience that I had with
Azure was that I knew how to spell it. At a high level, I knew that the
fundamentals between AWS and Azure were the same. I was lucky to have incredible
mentors at Amazon who <em>raised</em> me right in building my cloud skill set. I
recognized that there would be differences, and that I would learn the new
platform the same way. I created an account through the Azure portal in one
browser displayed on the left half of my screen, and viewed my AWS account on
the right half. With the <a href="https://docs.microsoft.com/en-us/azure/architecture/aws-professional/services">AWS to Azure services comparison</a> documentation in
another tab, I started building out one resource at a time. When I first joined
AWS, a colleague of mine reminded me that every public cloud is comprised of the
same three basic components: compute, storage, and network <!-- Thanks Magnus!
https://www.linkedin.com/in/1magnusbjorkman --> and that helped guide me as I
learned AWS. I knew that the same applied to Azure, and started my journey.</p>

<p>Azure was different. In some areas, it was better, and in some ways, it wasn’t.
The most significant difference for me (and one that I continue to struggle
with) is that the cornerstone of Azure is Azure Active Directory (<abbr title="Azure Active Directory">AAD</abbr>). For as
long as I can remember, Active Directory was my nemesis. It’s probably the
reason I spent more time administrating Linux hosts. In AWS, IAM provides a
concise set of controls that are responsible for authentication and
authorization of principles against the platform. <abbr title="Azure Active Directory">AAD</abbr>, in comparison, is
responsible for many more <a href="https://docs.microsoft.com/en-us/azure/active-directory/fundamentals/active-directory-whatis#which-features-work-in-azure-ad">features</a>. While <abbr title="Azure Active Directory">AAD</abbr> “<em>is Microsoft’s cloud-based
identity and access management service</em>”<sup id="fnref:1" role="doc-noteref"><a href="#fn:1" class="footnote" rel="footnote">1</a></sup>, it is capable of <strong>a lot</strong> more,
inherently by its design. For the professional without AD experience,
discovering the robust integration between Azure and <abbr title="Azure Active Directory">AAD</abbr> was overwhelming.</p>

<p>Weeks turned into months, and I continued to learn about each of the core
services in Azure. I compared them to the services I knew well in AWS and
practiced configuring them similarly. I continued using Microsoft’s
<a href="https://docs.microsoft.com/en-us/learn/">Learning</a> site for official guidance, and leaned on peers that I was working
with to fill in the solution architecture gaps. The challenge with learning
individual services is that you treat them as standalone entities. In the real
world, they are rarely configured as individuals and part of a larger solution.</p>

<p>Enter the <a href="https://docs.microsoft.com/en-us/learn/certifications/exams/az-303">AZ-303</a> and the <a href="https://docs.microsoft.com/en-us/learn/certifications/exams/az-304">AZ-304</a>, the two gates to obtaining the <a href="https://docs.microsoft.com/en-us/learn/certifications/azure-solutions-architect/">Azure
Solutions Architect Expert</a> certificate.</p>

<p>Both exams are designed to measure your solution architecture skills in unique
ways. The AZ-303 focuses on implementation of solutions, versus the AZ-304,
which focuses on the design of solutions. For those of you that are reading this
who are veterans in the industry, you understand the nuance between these two
definitions.</p>

<p>In February, I registered for both exams, two weeks apart giving myself the time
to prepare. I thought that reading through the public documentation, performing
the exercises on learn, and experimenting in my own subscription would be enough
to achieve a passing grade. I was wrong. I failed both exams.</p>

<p>When I reviewed the score report, I was expecting the areas for improvement to
be with Identity (and Security) correlating it with my weakness in <abbr title="Azure Active Directory">AAD</abbr>. While
there were questions that were <abbr title="Azure Active Directory">AAD</abbr> specific, it wasn’t the reason I didn’t pass.</p>

<p>For the AZ-303, I needed to improve my data platform knowledge.</p>

<p>For the AZ-304, my monitoring and business continuity knowledge.</p>

<p>Earlier this month, I took both exams again, and passed.</p>

<p>For the AZ-303, an area of improvement, data platforms, became my strength.</p>

<p>For the AZ-304, similarly to the AZ-303, monitoring turned into a strength,
closely followed by business continuity.</p>

<p>While I will admit that failing the exams on the first try gave me a baseline of
where I should focus my study, the most significant impact on my scores for the
second attempt came from real world experience. Over the past few months, I
spent the majority of my time working with customers in defining their strategic design
and implementation plans for observability and business continuity in Azure.
Their real world requirements reinforced the book knowledge that I had gained
in my preparation for the exams.</p>

<p>Through this process, I learned and was reminded of why I love this industry.
While the technology may change, the experience of actually using them in the
real world is where there is value. (The sentiment is absolutely applicable to
any industry) As always, I will continue to build my personal trove of
experiences to draw on for reference.</p>

<figure class="figure  ">
    <img class="figure_image" src="/assets/posts/2021/azure-solutions-architect-expert.png" />
    
</figure>

<div class="footnotes" role="doc-endnotes">
  <ol>
    <li id="fn:1" role="doc-endnote">
      <p><a href="https://docs.microsoft.com/en-us/azure/active-directory/fundamentals/active-directory-whatis">What is Azure Active Directory?</a> <a href="#fnref:1" class="reversefootnote" role="doc-backlink">&#8617;</a></p>
    </li>
  </ol>
</div>]]></content><author><name>Armen Kaleshian</name><email>armen@kriation.com</email></author><category term="azure" /><category term="certification" /><summary type="html"><![CDATA[When I joined Microsoft in August of ‘20, the only experience that I had with Azure was that I knew how to spell it. At a high level, I knew that the fundamentals between AWS and Azure were the same. I was lucky to have incredible mentors at Amazon who raised me right in building my cloud skill set. I recognized that there would be differences, and that I would learn the new platform the same way. I created an account through the Azure portal in one browser displayed on the left half of my screen, and viewed my AWS account on the right half. With the AWS to Azure services comparison documentation in another tab, I started building out one resource at a time. When I first joined AWS, a colleague of mine reminded me that every public cloud is comprised of the same three basic components: compute, storage, and network and that helped guide me as I learned AWS. I knew that the same applied to Azure, and started my journey.]]></summary></entry><entry><title type="html">Secrets management using Azure Managed HSM</title><link href="https://blog.kriation.com/2021/configuring-least-privilege-for-azure-managed-hsm.html" rel="alternate" type="text/html" title="Secrets management using Azure Managed HSM" /><published>2021-05-08T23:23:00-04:00</published><updated>2021-05-08T23:23:00-04:00</updated><id>https://blog.kriation.com/2021/configuring-least-privilege-for-azure-managed-hsm</id><content type="html" xml:base="https://blog.kriation.com/2021/configuring-least-privilege-for-azure-managed-hsm.html"><![CDATA[<p>The first post of this series described a solution to use an Azure Managed <abbr title="Hardware Security Module">HSM</abbr>
to wrap secrets stored in an Azure Key Vault. The intent of his design was to
comply with a given control that required secrets to be encrypted with keys that
were generated in a FIPS 140-2 Level 3 validated <abbr title="Hardware Security Module">HSM</abbr>. In my excitement to
publish the post, I completely neglected to discuss the differences in Role
Based Access Control (<abbr title="Role Based Access Control">RBAC</abbr>) required to interact with the Managed <abbr title="Hardware Security Module">HSM</abbr> versus the
Azure Key Vault. Thanks to <a href="https://twitter.com/KrisTurk86">KrisTurk86</a> on Twitter for bringing this to my
attention! In this post, I’ll describe why the roles between the two services
are different.</p>

<p>From the top, Azure manages access to resources through two planes: control and
data. The control plane provides the subscriber to instantiate a resource like a
virtual machine, a storage account, a key vault, or an instance of a managed
<abbr title="Hardware Security Module">HSM</abbr>. Once the resource is created, operations against the resource are performed
through its respective data plane. The <a href="https://docs.microsoft.com/en-us/azure/azure-resource-manager/management/control-plane-and-data-plane">Azure control plane and data plane</a>
article is a great read if you’re interested in more detail on this topic.</p>

<p>In the case of Key Vault and Managed <abbr title="Hardware Security Module">HSM</abbr>, they are managed through two different
data planes:</p>
<ul>
  <li>https://{vault-name}.vault.azure.net for Key Vault</li>
  <li>https://{hsm-name}.managedhsm.azure.net for Managed <abbr title="Hardware Security Module">HSM</abbr></li>
</ul>

<p>This means that when you’re interacting with either of these services through
the Azure Portal, or through any of the programmatic interfaces, the respective
<a href="https://docs.microsoft.com/en-us/azure/key-vault/general/authentication-requests-and-responses"><abbr title="Representational State Transfer">REST</abbr> API</a> calls to each service are being made against one of these two
endpoints. To add complexity to this topic, while the endpoints are different,
the API accessible to the caller is the same: <a href="https://docs.microsoft.com/en-us/rest/api/keyvault/">Key Vault <abbr title="Representational State Transfer">REST</abbr> API</a></p>

<p>I imagine the efficiency in mapping the existing Key Vault <abbr title="Representational State Transfer">REST</abbr> API to the
underlying Managed <abbr title="Hardware Security Module">HSM</abbr> API was significantly higher by the engineering team
during implementation. It also provides them the ability to extend the
capabilities of the Managed <abbr title="Hardware Security Module">HSM</abbr> to more than key objects in the future.</p>

<p>Now, how does authorization fit into this?</p>

<p>Up to this point, we identified that the only difference between the Key Vault
and the Managed <abbr title="Hardware Security Module">HSM</abbr> is the data plane <abbr title="Representational State Transfer">REST</abbr> API endpoint. How does Microsoft map
the caller’s request to the authorization model? Through the <a href="https://docs.microsoft.com/en-us/azure/role-based-access-control/resource-provider-operations#microsoftkeyvault">Resource Provider
operation</a> list of course! This list identifies (in theory - remember this
<a href="/2020/ssh-key-management-in-azure.html">post</a>) all of actions a caller can be evaluated for by the <abbr title="Role Based Access Control">RBAC</abbr> model
against a given resource.</p>

<p>For example, there is no differences in the <a href="https://docs.microsoft.com/en-us/rest/api/keyvault/createkey/createkey">createKey</a> <abbr title="Representational State Transfer">REST</abbr> API call for
key vault or a managed <abbr title="Hardware Security Module">HSM</abbr>; they are the same. This aligns with the
<code class="language-plaintext highlighter-rouge">Microsoft.KeyVault/vaults/keys/create/action</code> permission in the <a href="https://docs.microsoft.com/en-us/azure/role-based-access-control/resource-provider-operations#microsoftkeyvault">list</a> of actions
for the Key Vault API as there is no corresponding action for a Managed <abbr title="Hardware Security Module">HSM</abbr>
  target. By design, Microsoft is using the same API, simply with a different
  resource.</p>

<p>When <a href="https://twitter.com/KrisTurk86">KrisTurk86</a> mentioned his <a href="https://twitter.com/KrisTurk86/status/1388196890202841091">findings</a>, and after spending time
performing this research, it made sense why the Key Vault Adminstrator role
I suggested wouldn’t provide the right access. He discovered that the Managed
<abbr title="Hardware Security Module">HSM</abbr> Crypto User and Managed <abbr title="Hardware Security Module">HSM</abbr> Crypto Officer roles were the two default roles that
contained the permitted actions against the Managed <abbr title="Hardware Security Module">HSM</abbr>. When reviewing the
<a href="https://docs.microsoft.com/en-us/azure/key-vault/managed-hsm/built-in-roles#permitted-operations">matrix</a> of the default Managed <abbr title="Hardware Security Module">HSM</abbr> roles, it helped reinforce the nuance of the
<abbr title="Role Based Access Control">RBAC</abbr> for these two resources that are incredibly similar.</p>

<p>Combining the <a href="https://docs.microsoft.com/en-us/rest/api/azure/"><abbr title="Representational State Transfer">REST</abbr> API</a> and <a href="https://docs.microsoft.com/en-us/azure/role-based-access-control/resource-provider-operations">Azure <abbr title="Role Based Access Control">RBAC</abbr></a> references is incredibly
helpful in determining least privilege on the platform. As you build out your
environment, it’s easy to use the built in roles to get the job done (as
happened to me in the previous post) but to define least privilege and improve
your security posture requires a focussed effort.</p>]]></content><author><name>Armen Kaleshian</name><email>armen@kriation.com</email></author><category term="azure" /><category term="azure managed hsm" /><category term="rbac" /><category term="security" /><summary type="html"><![CDATA[The first post of this series described a solution to use an Azure Managed HSM to wrap secrets stored in an Azure Key Vault. The intent of his design was to comply with a given control that required secrets to be encrypted with keys that were generated in a FIPS 140-2 Level 3 validated HSM. In my excitement to publish the post, I completely neglected to discuss the differences in Role Based Access Control (RBAC) required to interact with the Managed HSM versus the Azure Key Vault. Thanks to KrisTurk86 on Twitter for bringing this to my attention! In this post, I’ll describe why the roles between the two services are different.]]></summary></entry></feed>